Nov . 30, 2024 17:13 Back to list
Drop T-Bar Bracket Solutions for Effective Ceiling Installations and Support Systems
Understanding Drop Ceiling T-Bar Brackets A Comprehensive Guide
When it comes to constructing or renovating a space, particularly in commercial or industrial settings, drop ceilings are a popular choice. A key component of drop ceilings is the T-bar grid system, which supports the acoustic tiles and panels that create a finished ceiling surface. Within this system, T-bar brackets play a crucial role in ensuring the stability and aesthetic quality of the ceiling. In this article, we will delve into the importance of drop ceiling T-bar brackets, their types, installation process, and maintenance tips.
What are Drop Ceiling T-Bar Brackets?
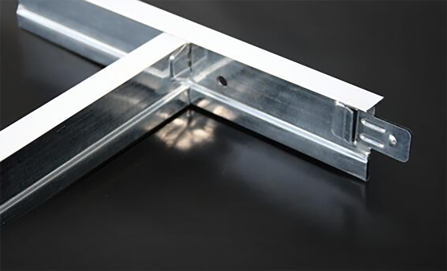
Drop ceiling T-bar brackets are metal or plastic connectors designed to link the T-bars that make up the grid system of a drop ceiling. They provide not only structural support but also facilitate alignment and leveling of the grid. The purpose of these brackets is to connect the horizontal T-bars with the vertical supports or grid clips, creating a secure framework for the ceiling tiles.
Types of T-Bar Brackets
There are various types of T-bar brackets available, each tailored for specific applications
1. Flat Brackets Often used at the intersection of T-bars to provide a flat surface for connecting multiple bars. They are essential for creating a sturdy grid arrangement. 2. Corner Brackets Designed specifically for securing the end of T-bars at corners where two T-bars meet at a right angle. These brackets are crucial for maintaining the alignment and overall integrity of the grid. 3. Tile Support Brackets These brackets are used for additional support under acoustic tiles to prevent sagging, especially in areas with heavier tiles.
4. Adjustable Brackets These provide flexibility in height adjustments, accommodating variations in building structures.
Choosing the right type of T-bar bracket is essential for ensuring the overall stability and longevity of the drop ceiling system.
Installation Process
Installing drop ceiling T-bar brackets requires precision and attention to detail. Here’s a step-by-step guide
1. Prepare the Area Clear the space where the drop ceiling will be installed. Ensure that electrical and plumbing systems are accounted for and properly managed.
drop ceiling t bar bracket

2. Measure and Mark Use a measuring tape to determine the height of the ceiling and mark where the main T-bars will be placed. Plan for the fixture locations, such as lights or vents.
3. Install Main T-Bars Begin by installing the main T-bars, securing them to the ceiling structure with appropriate hangers. Make sure they are level and spaced correctly, typically 4 feet apart.
4. Install Cross T-Bars Once the main bars are secure, install the cross T-bars at right angles, securing them with the appropriate T-bar brackets. This is where the flat brackets come into play, ensuring a strong connection.
5. Secure Brackets As you install each T-bar, secure the brackets tightly to prevent any movement. This is critical to prevent sagging or misalignment over time.
6. Install Tiles With the grid firmly in place, you can now insert the acoustic tiles. Ensure that each tile fits snugly within the grid, providing an aesthetically pleasing finish.
Maintenance Tips
To keep your drop ceiling in optimal condition, regular maintenance is necessary
- Regular Inspections Periodically check for any signs of sagging tiles or loose brackets. Address any issues immediately to prevent more significant problems. - Cleaning Dust and dirt can accumulate on the tiles and brackets. Gently cleaning them with a damp cloth can keep your ceiling looking new.
- Repairs If you notice any damage or deterioration in the T-bar brackets or grid system, replace them promptly to maintain structural integrity.
Conclusion
Drop ceiling T-bar brackets are integral to creating a stable and visually appealing ceiling in various environments. By understanding their types, installation processes, and maintenance needs, you can ensure your drop ceiling remains functional and aesthetically pleasing for years. Whether you are a DIY enthusiast or a professional contractor, appreciating the role of these brackets will enhance the quality of your ceiling installations.
-
Quality Ceiling Trap Doors & Access Panels | Easy & Secure AccessNewsAug.30,2025
-
Durable Ceiling T Grid Systems | Easy InstallationNewsAug.29,2025
-
PVC Gypsum Ceiling: Durable, Laminated Tiles for Modern SpacesNewsAug.28,2025
-
Pvc Gypsum Ceiling Is DurableNewsAug.21,2025
-
Mineral Fiber Board Is DurableNewsAug.21,2025
-
Ceiling Tile Clip Reusable DesignNewsAug.21,2025


