


- Afrikaans
- Albanian
- Amharic
- Arabic
- Armenian
- Azerbaijani
- Basque
- Belarusian
- Bengali
- Bosnian
- Bulgarian
- Catalan
- Cebuano
- Corsican
- Croatian
- Czech
- Danish
- Dutch
- English
- Esperanto
- Estonian
- French
- German
- Greek
- Hindi
- Indonesian
- irish
- Italian
- Japanese
- Korean
- Lao
- Malay
- Myanmar
- Norwegian
- Norwegian
- Polish
- Portuguese
- Romanian
- Russian
- Serbian
- Spanish
- Swedish
- Thai
- Turkish
- Ukrainian
- Uzbek
- Vietnamese
get a quote
Peb . 15, 2025 20:32 Back to list
how to make an access panel in drywall ceiling
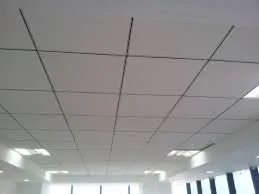
Creating an access panel in a drywall ceiling is a practical solution for homeowners and professionals alike, offering straightforward access to utilities such as plumbing, electrical wiring, or ductwork that may need routine maintenance or emergency attention. This article guides you through a step-by-step process, ensuring both safety and aesthetic integrity.
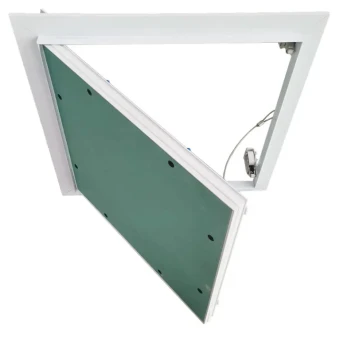
After cutting the opening, it's vital to prepare the frame for your access panel. If your panel kit includes a frame, follow the manufacturer's installation instructions closely. Generally, you will secure the frame within the opening using screws or nails. Ensure that it’s flush with the ceiling surface to maintain a clean, professional look. Installing the panel itself is often straightforward, especially when using a kit. Attach the panel to the frame, ensuring a snug fit that also allows for easy removal when access is needed in the future. Some access panels feature a hinge mechanism or a detachable setup, both designed for user convenience. For a seamless finish, apply a coat of primer and paint that matches the surrounding ceiling. This step ensures that the access panel blends in aesthetically, preserving the room’s decor while maintaining accessible functionality. If using a textured ceiling, consider applying matching texture spray or patching compound to the panel and its edges for a more cohesive appearance. Safety should be paramount throughout this process. Utilize the appropriate personal protective equipment, such as safety goggles and masks, particularly when handling cutting tools and drywall material. Moreover, if any utilities are exposed, consider consulting a professional to address specialized concerns such as electrical safety or plumbing reliability. Concluding the project with a functional yet discreet access panel reflects not just a job well done, but a valuable enhancement to any home infrastructure. Maintaining accessibility while prioritizing aesthetic considerations showcases both expertise and an eye for detail, critical components in effective and responsible home maintenance.
After cutting the opening, it's vital to prepare the frame for your access panel. If your panel kit includes a frame, follow the manufacturer's installation instructions closely. Generally, you will secure the frame within the opening using screws or nails. Ensure that it’s flush with the ceiling surface to maintain a clean, professional look. Installing the panel itself is often straightforward, especially when using a kit. Attach the panel to the frame, ensuring a snug fit that also allows for easy removal when access is needed in the future. Some access panels feature a hinge mechanism or a detachable setup, both designed for user convenience. For a seamless finish, apply a coat of primer and paint that matches the surrounding ceiling. This step ensures that the access panel blends in aesthetically, preserving the room’s decor while maintaining accessible functionality. If using a textured ceiling, consider applying matching texture spray or patching compound to the panel and its edges for a more cohesive appearance. Safety should be paramount throughout this process. Utilize the appropriate personal protective equipment, such as safety goggles and masks, particularly when handling cutting tools and drywall material. Moreover, if any utilities are exposed, consider consulting a professional to address specialized concerns such as electrical safety or plumbing reliability. Concluding the project with a functional yet discreet access panel reflects not just a job well done, but a valuable enhancement to any home infrastructure. Maintaining accessibility while prioritizing aesthetic considerations showcases both expertise and an eye for detail, critical components in effective and responsible home maintenance.
Latest news
-
Transform Interiors with PVC Gypsum Ceiling: A Stylish, Durable, and Moisture-Resistant SolutionNewsMay.19,2025
-
The Smart Interior Upgrade: Discover the Durability and Versatility of Gypsum Ceiling Access Panel SolutionsNewsMay.19,2025
-
The Smart Choice for Interior Design: Discover the Value of PVC Gypsum Ceiling SolutionsNewsMay.19,2025
-
Mineral Fiber Ceiling Tiles: The Smart Blend of Performance and AestheticsNewsMay.19,2025
-
Mineral Fiber Ceiling Tiles: The Superior Choice Over Gypsum for Sound and Fire SafetyNewsMay.19,2025
-
Mineral Fiber Ceiling Tiles: Eco-Friendly Strength and Style for Every CeilingNewsMay.19,2025


