types of ceiling tile

Popular on the whole site
A suspended ceiling tile grid is a framework system that supports tiles, panels, or other acoustic materials. This grid is hung from the overhead structural ceiling using metal suspension wires or hangers, allowing the tiles to be installed at a lower height. The space between the suspended ceiling and the original ceiling can be utilized for various purposes, including hiding wiring, ductwork, and other mechanical components, thereby creating a neat and organized appearance.
4. Flexibility in Various Environments The versatility of the 12x12 ceiling access panel makes it suitable for various applications, including residential spaces, commercial buildings, and industrial settings. Whether installed in a bathroom for plumbing access or in an office to reach electrical systems, these panels can adapt to different needs. Their standard size also makes them easy to source and replace when necessary.
12x12 ceiling access panel

3. Aesthetic Integration Modern access panels are designed to blend into various ceiling types and decor styles. They can be painted or finished to match surrounding surfaces, minimizing their visual impact. This is particularly important in commercial settings where appearance matters, such as offices, restaurants, and retail spaces. Concealed access points maintain the aesthetic integrity of a space while providing the necessary functionality.
Applications of Ceiling Access Panels
While cross tees offer numerous benefits, there are also factors to consider to ensure a successful installation
With the hanger wires in place, it’s time to install the main runners. Start one end of the main runner into the wall angle, then adjust the other end to hang from the hanger wires. Use a level to ensure the runner is straight, making any adjustments as necessary. Secure the runner to the hanger wires with wire ties or clamps.
Step 6 Inspect the Area Behind the Panel
Conclusion
Links
-
One of the key factors contributing to the success of pattern glass suppliers is their commitment to sustainability. Many modern suppliers emphasize the use of recycled materials and eco-friendly production processes, catering to environmentally-conscious consumers. This trend is particularly appealing as the importance of sustainable building practices continues to gain momentum in the industry.
pattern glass suppliers
- Patterned glass, an aesthetic and functional material, has been a staple in architectural design for centuries. Its unique patterns not only provide visual appeal but also offer privacy and light diffusion, making it a versatile choice for various applications. The manufacturers behind these intricate designs play a crucial role in shaping the industry.
-
Third, installation and connection check
- The Rising Cost of 6mm Float Glass A Comprehensive Analysis
- In addition to their ease of installation, aluminum alloy mirrors are also known for their durability. The strength of aluminum allows these mirrors to withstand the daily wear and tear of use, making them a long-lasting and reliable choice for home décor. Whether used in a bathroom, bedroom, or living room, an aluminum alloy mirror is sure to stand the test of time.
- Patterned glass, with its intricate designs and delicate beauty, has long been a symbol of elegance and sophistication. It is not merely a material used for practical purposes but an art form that adds a touch of luxury to any space it adorns. The allure of patterned glass lies in its ability to transform ordinary surfaces into works of art, capturing the essence of light and casting it in a myriad of captivating patterns.
-
In our modern world, the importance of energy efficiency and safety cannot be overstated. As buildings become taller and more complex, the demand for materials that provide both thermal regulation and structural integrity has surged. One innovative solution that addresses these needs is Low-Emissivity (Low-E) safety glass. This specialized type of glass offers numerous benefits that make it a top choice for architects, builders, and homeowners alike.
- Furthermore, dark grey float glass is a versatile material that can be customized to suit a wide range of design preferences. It can be tempered or laminated for added strength and safety, making it suitable for use in high-traffic areas or in structures that require enhanced security. The glass can also be coated with additional treatments to improve its performance, such as anti-reflective or self-cleaning coatings that reduce maintenance requirements.
- Future Trends in the Market
- Historical Roots
- Moreover, the versatility of tempered acid etched glass allows for customization
- Pyrolytic Low-E glass, also known as hard coat Low-E glass, is manufactured through a unique process called pyrolysis. This involves applying a thin layer of metal oxide, usually tin or silver, onto the surface of the glass while it's still hot, typically at temperatures around 600°C. The result is a highly reflective, yet transparent, glass surface that offers exceptional thermal insulation properties.
- The Enchanting World Behind Reflective Float Glass
- The mirror's frame was crafted from sturdy aluminum, giving it a durable and long-lasting quality that would withstand the test of time. Its sleek lines and minimalist design made it a stylish addition to any room, whether it be a bedroom, bathroom, or living space.
- The Unheralded Elegance of Low-Rated Windows
- 3. Environmental Regulations Environmental regulations and concerns may impact the production and use of 5mm reflective glass. Manufacturers may need to invest in more environmentally friendly production methods to comply with these regulations, which could lead to increased costs.
- Additionally, float glass manufacturers can explore new applications for their products, such as in the automotive and aerospace industries. Float glass can be used to create lightweight, shatter-resistant windshields and windows for vehicles, as well as for aircraft cabins, where safety and durability are paramount.
- Another advantage of silver makeup mirrors is their versatility
- The Buy Low, Sell High mantra encourages astute consumers to capitalize on market fluctuations, particularly in sectors like e-glasses where product cycles can be swift. As with any emerging technology, early adopters often bear the brunt of high initial costs. However, as the technology matures and competition increases, prices tend to decline, presenting an opportune moment for buyers to make a wise investment.
- And yet, for all its seeming frailty, the glass plate endures
- As global demand for clear float glass continues to rise, these manufacturers are not just producing a commodity but are also driving technological advancements that benefit society as a whole. From architectural wonders that utilize glass's aesthetic appeal to vehicles that prioritize safety and efficiency, clear float glass manufacturers stand at the forefront of modern industrial progress.
- The silver bamboo mirror is not just a decorative object; it is a cultural artifact that carries centuries of history and tradition. In Chinese culture, the bamboo plant is revered for its resilience and versatility, making it a popular symbol in art and design. The silver bamboo mirror captures the essence of this cultural symbolism, making it a valuable and cherished piece in any collection.
- In addition to product quality, customer service plays a crucial role in the success of acid-etched glass suppliers
 acid etched glass suppliers. They need to provide excellent pre- and post-sales support, including assistance in design conception, accurate estimation, prompt delivery, and efficient installation. Many suppliers also offer repair and maintenance services to ensure customer satisfaction.
 - Laminated float glass, another variant, consists of multiple layers bonded together with an interlayer, typically polyvinyl butyral. Even when fractured, the glass adheres to the interlayer, preventing dangerous shards from dispersing—a characteristic that has earned it a place in windshields and protective barriers Even when fractured, the glass adheres to the interlayer, preventing dangerous shards from dispersing—a characteristic that has earned it a place in windshields and protective barriers
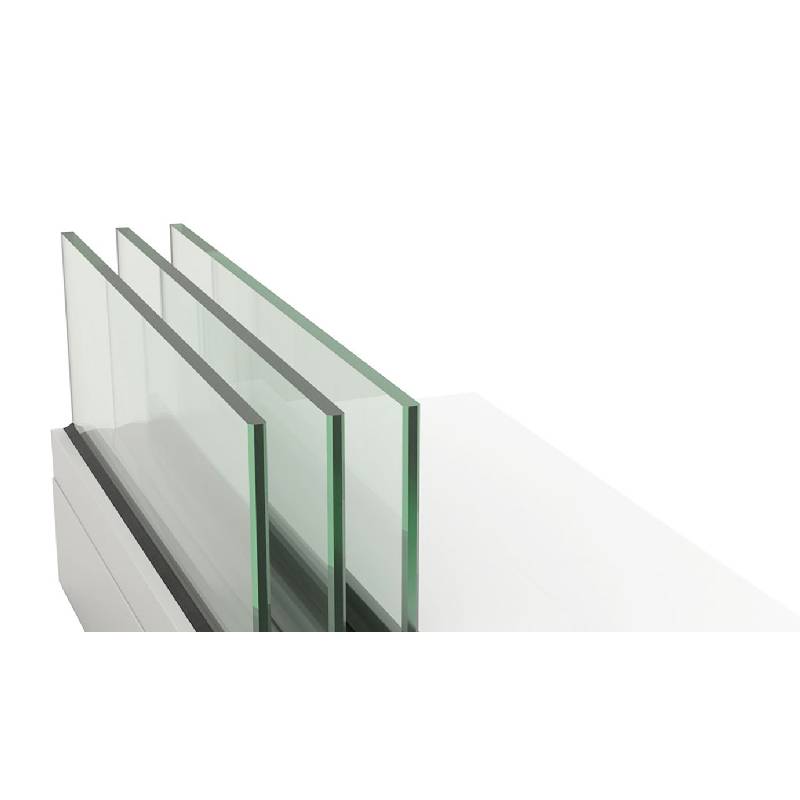 Even when fractured, the glass adheres to the interlayer, preventing dangerous shards from dispersing—a characteristic that has earned it a place in windshields and protective barriers Even when fractured, the glass adheres to the interlayer, preventing dangerous shards from dispersing—a characteristic that has earned it a place in windshields and protective barrierstypes of float glass.
 - Full frosted glass is a design trend that has gained popularity in recent years. This type of glass treatment provides privacy while still allowing light to filter through, making it a versatile option for both residential and commercial spaces.
-
- In today's fast-paced business environment, inventory management plays a crucial role in maintaining operational efficiency and financial stability. One key aspect of effective inventory management is the concept of average replacement cost. This method of accounting for inventory helps businesses to accurately measure the cost of goods sold and make informed decisions regarding their stock levels.
- The cost of IGU replacement can vary depending on factors such as the size of the unit, the type of glass used, and the complexity of the installation process. It is important to obtain quotes from multiple glazing companies to ensure that you are getting a competitive price for the service.
-
Float Glass Sheets An Overview of Their Characteristics and Applications
- In terms of clarity, clear tempered glass maintains an excellent transparency, allowing unobstructed views and abundant natural light to permeate spaces. Its transparency not only enhances the visual appeal but also contributes to energy efficiency by reducing the need for artificial lighting during daytime. It's this transparency that makes it a popular choice for windows, doors, and facades in modern buildings, offering a seamless blend of indoor and outdoor environments.
- The mirror, with its lustrous silver frame, gleams in the flickering light of the fireplace. Its antique design, adorned with intricate engravings, speaks volumes about bygone eras and vintage elegance. The silver, tarnished slightly by time, adds a patina of history, enhancing the ambiance with a touch of nostalgia. It's a testament to the passage of time, a silent observer of family traditions and celebrations.
-
While I agree with most of what Mauro says, I'm not sure if glass is really neutral, or if any technology can be said to be. I think to call glass a neutral technology is just a generalization, just like we call glass a solid. And judging whether the glass technology is neutral is far more ambiguous than determining whether the glass is solid. Technology is not inert. It's not a stone; It's a language. Just like a language, we must accept its multiple uses. We can pray; We can lie. Sometimes, we do both at the same time.
- The Float Glass Center A Sustainable Masterpiece
- A solid silver mirror is crafted from pure silver, a material renowned for its lustrous sheen and remarkable durability. The process of creating such a masterpiece is a journey in itself, requiring a blend of technical precision and artistic vision. Each curve, each contour, and every intricate detail is meticulously carved by hand, turning raw silver into a work of art that reflects more than just one's image.
- In conclusion, the price of 8mm frosted glass represents an investment in both functionality and style. While there are upfront costs to consider, the long-term advantages in terms of privacy, design, and ease of maintenance make it an economical choice for those looking to upgrade their interiors with a touch of elegance. By carefully considering the specific needs of a project and comparing prices across different suppliers, consumers can secure an attractive deal on 8mm frosted glass, ensuring their space remains both beautiful and budget-friendly.
- As she looked into the mirror, Silver knew that her time as the kingdom's protector was coming to an end. But she was content, knowing that she had fulfilled her destiny and made a difference in the lives of her people.
- Silver mirror, a term that resonates with elegance and mystique, is an exquisite representation of ancient Chinese craftsmanship. It not only symbolizes the refinement of Chinese artistry but also reflects the rich cultural heritage of China. This article delves into the world of 'Silver Mirror China', a testament to the country's metallurgical prowess and aesthetic sensibilities.
- In conclusion, mirror reflective glass is a remarkable material that offers both aesthetic appeal and practical benefits. Its ability to reflect images like a mirror while remaining transparent makes it an ideal choice for various applications in design and architecture. As technology continues to advance, we can expect even more innovative uses for this fascinating material in the future.
-
In conclusion, toughened mirror glass is a durable, stylish, and versatile choice for those looking to add a touch of sophistication to their living spaces. Its strength and resilience make it a practical option for areas where breakage is a concern, while its sleek design and reflective properties can help to elevate the look of any room. Whether used as a wall mirror, furniture accent, or decorative piece, toughened mirror glass is sure to add a touch of modern elegance to any home.
- The Ming (1368-1644) and Qing (1644-1912) Dynasties further embellished the silver mirror tradition
- Once upon a time in a magical kingdom, there lived a beautiful princess named Silver. She was known throughout the land for her stunning silver hair that shone like a mirror in the sunlight. Her beauty was unmatched, and many suitors from far and wide sought her hand in marriage.
-
Understanding the Price of 6mm Frosted Glass
- Frosted Glass, on the other hand, offers a level of privacy while still allowing light to pass through. It is created by etching or sandblasting the surface of the glass, giving it a translucent, matte finish. Frosted glass is commonly used in bathrooms, offices, and other areas where privacy is desired.
- The most common type is the clear float glass, known for its transparency and clarity. It is the workhorse of the construction industry, used in windows, doors, and skylights, allowing natural light to flood interior spaces. This type offers not only visual aesthetics but also energy efficiency when combined with insulating layers.
- Tempered glass is also commonly used in the automotive industry, where it is used in car windows and windshields. The strength of tempered glass makes it an ideal choice for protecting drivers and passengers in the event of a collision.
-
The age of Enlightenment, the slide show was born. Slideshows can be a form of dramatic entertainment that some find terrifying, but others find hopeful - depending on how people choose to watch it.
-
- Modern Applications
- OEM tinted glass is a type of glass that has been specially treated to block out a certain amount of light and heat. This type of glass is often used in vehicles and buildings to help reduce glare, protect the interior from UV rays, and improve overall aesthetic appeal.
- Secondly, the quality of raw materials impacts the pricing. 10mm tempered glass is primarily made from silica sand, soda ash, limestone, and other additives. Fluctuations in the global market for these materials can lead to variations in the cost. For instance, if there's a shortage of silica sand, the price of tempered glass may rise correspondingly.
- Angular Contact Ball Bearings Product Guide and Specifications Overview
- 28580 bearing
- weizi bearing bearing ball deep groove
- Roulements à contact angulaire - Performance et Précision
- weizi bearing bearing pressing machine
- weizi bearing cylindrical roller bearing supplier
- weizi bearing nj 206 bearing
- weizi bearing 23244 bearing
- Similar title to 4T L44649 Bearing can be Replacement Bearing for 4T L44649, High Quality and Durable
- Design and Applications of Single Thrust Ball Bearings in Machinery Systems