access panel ceiling size
-
...
Moreover, mineral fiber ceilings are easy to install and maintain
. The tiles can be placed directly into a suspended grid system, allowing for quick installation and the ability to conceal wiring and ductwork. Additionally, if a tile becomes damaged, replacing it is straightforward and less disruptive than repairing traditional ceilings.
mineral fiber ceiling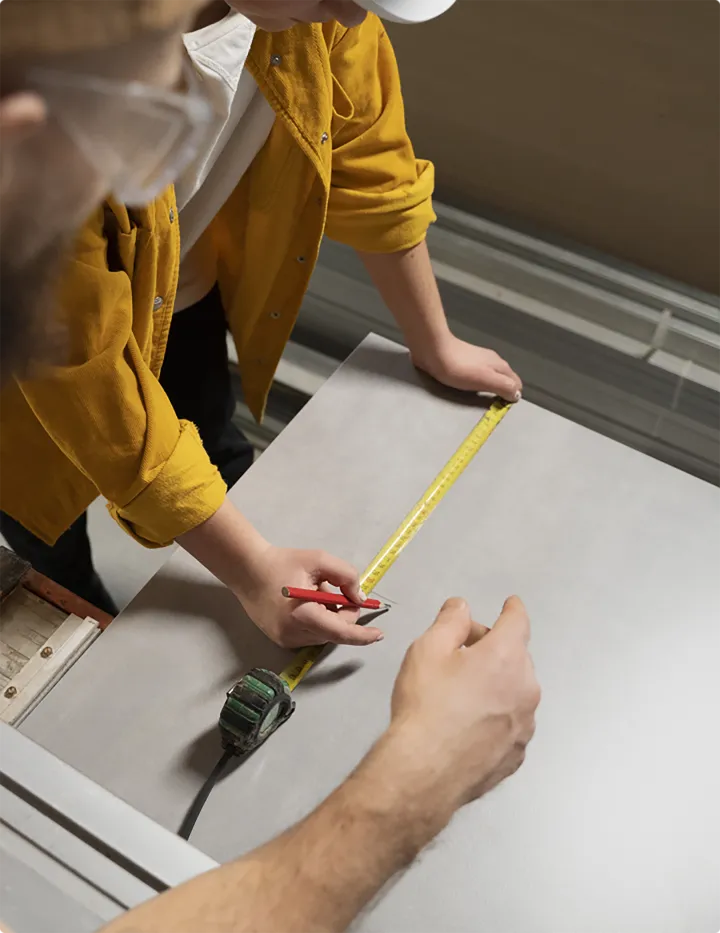
...
1. Location The placement of the panel should facilitate easy access to the systems behind the ceiling while remaining unobtrusive.
The type of materials used for the attic access door is equally important. Options range from lightweight aluminum to sturdy wooden doors, with various finishes to match your home decor. The choice largely depends on the accessibility requirements and the design preferences of the homeowner. For instance, if the attic is frequently accessed, a heavy-duty door with a reliable locking mechanism may be ideal. Conversely, for less frequent use, a lightweight door might suffice.
It offers privacy with its sound blocking features in settings like an office. So it's a good choice of the ceiling in places like an office, meeting spaces, classrooms and other environments.
Acoustics – Noise is one of the most distracting issues within spaces no matter where you go: restaurants, grocery stores, offices, etc. Our suspended ceiling tiles are designed to handle sound absorption (less echos and feedback, also known as “NRC”) and sound blocking (noise traveling between closed spaces, also known as “CAC”). Not only is it important to control the noise in a space (sound absorption), but also it’s equally important to maintain privacy in areas such as classrooms, exam rooms, meeting spaces as well as offices (sound blocking).
Popular articles
- 1
3. Cut the Drywall
- 2
- 3
Another advantage that often goes unnoticed with PVC laminated ceilings is their sound insulation properties. The panels help to reduce noise transmission between rooms, providing a quieter and more peaceful living environment. This feature is particularly beneficial in multi-story homes or apartments where noise can easily travel through ceilings and floors.
- 4
Additionally, access panels can facilitate future upgrades or modifications to existing installations. By allowing easy entry, they enable quick fixes and replacements, minimizing downtime and potential disruptions to daily operations. Furthermore, they contribute to the overall safety of the building by ensuring that emergency services can quickly access vital systems when needed.
- 5
Understanding Sheetrock Ceiling Access Panels
- 6
What is a Ceiling Grid Tee?
- 7
What is a Grid Ceiling?
- 8
6. Geographical Location The location where the tiles are purchased can impact the cost. For instance, urban areas with higher living costs might exhibit increased prices compared to rural areas. Additionally, freight costs for shipping tiles to different locations can also influence the final sale price.
- 9
Cross tee ceilings also offer flexibility in design. The grid pattern not only enhances the aesthetics but also allows for a variety of finishes and textures. Building owners can experiment with different tile colors and designs, giving them the freedom to adapt the atmosphere of a space according to its function—be it professional, casual, or welcoming.
cross tee ceiling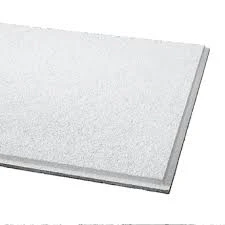
- 10
Grid ceilings, also known as suspended ceilings or drop ceilings, consist of a framework of metal grids that hold acoustic tiles or gypsum boards. This system allows for easy access to the space above the ceiling, making maintenance and repairs more manageable. The grid structure creates a void between the ceiling and the actual overhead space, which can accommodate electrical wires, plumbing, and HVAC ducts.
gypsum and grid ceiling
Links
- The construction aggregate industry conveys all forms of slurry, from fine sand to coarse aggregates.
- WL Series Light-duty pumps are cantilevered, horizontal centrifugal slurry pumps. They are suitable for delivering low density slurries for metallurgical, mining, coal and building material departments. The shaft seal adopts both gland seal and centrifugal seal.
- Heavy-Duty Slurry Pump
- A variety of factors must be considered to ensure a satisfactory service. Here are tips for choosing the right >pump. In applications ranging from processing to wastewater treatment, plants often have to handle slurries. Handling this mixture of liquids and solids can be challenging and difficult. Some of the key factors in slurry pumping are the size and nature of the solids in the liquid and the type of wear they cause. Another is the corrosiveness of the liquid or mixture.
- >Dredge pumps are a special category of pumps used in the dredging process. Dredging is the process of transporting submerged sediments (usually sand, gravel or rock) from one area to another. Dredging takes place in the shallow waters of lakes, rivers or seas for land reclamation, dredging, flood control, new harbours or expansion of existing harbours. The various industries that use dredge pumps are therefore the construction industry, mining, the coal industry and the oil and gas industry.
- In addition, a new level of complexity is added to an otherwise simple machine. Other parts must now be inventoried and training beyond basic spanner turning is required. When it comes to pumping rock and some of the world's most abrasive materials.
- Slurry pumps with rubber lining are the ideal pump for the mineral sand industry. They have a special rubber lining that makes them heavy duty pumps capable of withstanding high levels of abrasion.
- It is important that the pump you choose has components that will not wear out from abrasive slurries.
- Slurry Pump Selection
- The dredge pump is designed to draw sediment, debris and other hazardous materials from the surface layer into the suction pipe and transport the material through the pipe to the discharge site. The pump must be able to handle common solid debris of various sizes that can pass through the pump, thus minimizing the downtime required for cleaning.
- Aier Machinery Hebei Co., Ltd. is a large-scale professional >slurry pumps manufacturer, gravel pumps, dredge pumps, sewage pumps and clean water pumps in China.
- Slurry pump considerations
- sets or tons on high chrome alloy castings. Main products are Type WA, WG, WL, WN, WY, WZ, etc. Size: 25-1200mm,
- If you want to know more information about the best slurry pumps wholesale, welcome to >contact us today or request a quote.
- Pumps designed to pump slurries will be heavier than pumps designed for less viscous liquids because slurries are heavy and difficult to pump.
- Determine the perfect combination of slow pumping (to reduce wear) and fast pumping to prevent solids from settling and clogging.
- Other manufacturers looking for differentiation, if not the end result, may choose to add a small part to their pump assembly in the description, thus allowing in-line adjustment of the wear ring in the suction side lining assembly.
- 2. All have vertical pumps and horizontal pumps and can convey slurry.
- Customised pumps
- Longer maintenance intervals
- Repairable - target=_blank title=Rubber Lined Slurry Pumps>Rubber lined slurry pumps can be repaired by simply replacing the bushing.
- >Vertical Slurry Pump
- WZ series slurry pumps are new type wear resistant & corrosion resistant slurry pump for the complexity and specificity of coal, power plant, metallurgy, chemical, building materials and other industries.
- Some models can generate discharge pressures up to 260 ft. (80 m).
- The slurry weight or consistency determines the type, design and capacity of the slurry pump required. If you have any questions about the best pump for your application, welcome to >contact us today or request a quote.
- These mud pumps can pump not only sand, but also more mud. They are very effective in pumping all forms of mud, gravel, concrete, slurry, slush, etc.
- Slurry pumps can be used for.
- Packing the box seal
- - Pumping media where abrasive particles are present
- Fewer and thicker vanes on the impeller. This makes it easier for solids to pass through than the 5-9 vanes on a standard centrifugal pump - usually 2-5 vanes.
- The slurry pump is mainly used in the mining industry, its wear resistance is strong. So It conveys slurry that containing slag, but it can conveys mud. The mud pump is usually made of cast iron, the wear resistance of the pump is low. So the mud pumps often used for conveying mud or slurry containing suspended particles.
- Pumping mud is not as easy as pumping water. Depending on the type of slurry, there are many variables in choosing the right pump for the slurry. There is no formula or set-in-stone answer as to what the best slurry pump design is. You must combine knowledge and application details to select the ideal , slurry pump, . Lets talk about how slurry pumps differ from standard pumps and how to narrow your choices.
- The company uses advanced computer assistant engineering software to design products and technology, which makes our
- Hydrostatic head - i.e. the height to which the slurry must be lifted in the piping system.
- Especially when the dredging depth reaches 20m or more, the above situation will be more obvious. The use of underwater pumps can effectively improve the above situation. The lower the installation position of underwater pumps, the smaller the suction resistance and vacuum, which can obviously reduce the losses during the work and improve the working efficiency. The installation of underwater pump can effectively increase the dredging depth and improve the ability to transport sediment.
- A >dredge pump is a horizontal centrifugal pump that is the heart of a dredger. It is designed to handle suspended abrasive granular materials and solids of limited size. Without a dredge pump, a stranded dredger would not be able to deliver mud.
- The frame plate for WAJ series pumps has interchangeable hard metal or pressure moulded elastomer liners. The impellers are made of pressure moulded elastomer liners.The shaft seals for WAJ series can be packing seal, centrifugal seal or mechanical seal.
- 1. The two types of pumps are all centrifugal pumps in the working principle. They are machines that increase the energy of solid and liquid mixtures by means of centrifugal force (the rotation of the impeller of the pump). A device that converts electrical energy into kinetic and potential energy of a medium.
- There is a better way to pump sewage, overflows and other collected dirty water around the plant.
- - Portable and low maintenance - There are no long or exposed mechanical shafts between the motor and worm gear, which makes the submersible pump more portable. In addition, because there are no long or exposed mechanical connections between the motor and worm gear, less maintenance is required and operating costs are significantly lower.
- Metal and/or rubber pump bushings are used to combat the erosion of solid particles found in the slurry. Metal slurry pump housings are usually made of carbide to resist erosion caused by increased pressure and circulation. Sometimes wear-resistant steel is used on the pump casing so that the pump can be welded if repairs are needed.
- Slurry pump construction materials
- High head (i.e. the height to which the pump can move the liquid)
- Longer maintenance intervals
- A typical pump solution for this application is to install a hard metal >slurry pump to withstand these types of conditions. Hard metal pumps need to be able to withstand the most severe abrasive slurry service and they also need to be designed to be extremely easy to maintain and safe.
- Our firm has strong technical force and is specially engaged in the research of abrasion resistant materials of slurry pumps, sewage pumps and water pumps and the development of new products. The materials include high chrome white iron, duplex stainless steel, stainless steel, ductile iron, rubber, etc.
- If you want to get more information about the slurry pumps for sale, welcome to target=_blank title=Contact Us>contact us.
- When the slurry pump working, pump parts are easy to be impacted, wear, and corrosion, etc. Therefore, the liner of the slurry pump uses wear-resistant material, such as high chromium alloy, rubber. The wear-resistant materials can effectively reduce the wear parts of the pump. So most of the slurry pump is a wear-resistant slurry pump in the current market.
- A variety of factors must be considered to ensure a satisfactory service. Here are tips for choosing the right , pump, .xa0, In applications ranging from processing to wastewater treatment, plants often have to handle slurries. Handling this mixture of liquids and solids can be challenging and difficult. Some of the key factors in slurry pumping are the size and nature of the solids in the liquid and the type of wear they cause. Another is the corrosiveness of the liquid or mixture.
- Safety
- Effective Security Solution with Anti-Theft Barbed Wire Mesh for Enhanced Protection
- Manufacturers producing iron wire coil under HS code for global distribution.
- High-Capacity 300 Gallon Stainless Steel Water Storage Solution for Various Needs
- Exploring the Benefits and Applications of Plastic GI Sheets in Modern Construction Projects
- Durable PVC Coated Square Wire Mesh for Various Applications and Enhanced Outdoor Longevity
- High Capacity 1000 Liters Stainless Steel Water Tank for Reliable Storage Solutions
- Durable Hexagonal Wire Netting with PVC Coating for Enhanced Outdoor Protection and Versatility
- Nylon Window Screen Manufacturing Facility for Quality and Durability Solutions in Home Improvement
- Design Considerations for Anchoring Deformed Bars in Construction Applications and Structural Integrity
- Innovative Strategies for Enhancing Efficiency and Performance in Cooling Tower Systems Today