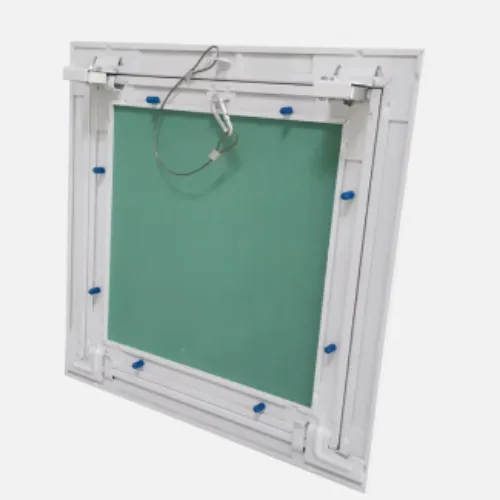
flush mount ceiling access panel
Popular on the whole site
3. Mark the Area Use a pencil to mark the dimensions of the opening on the ceiling. It’s advisable to draw a square or rectangle to ensure a straight cut.
2. Cut the Opening Mark the dimensions of the access panel on the plasterboard. Use a drywall saw to cut out the marked area carefully. Ensure that you cut within the lines to achieve a neat opening.
ceiling access panel plasterboard
6. Eco-Friendly Options Many PVC ceiling products are manufactured using environmentally friendly processes. Furthermore, due to their long lifespan and recyclability, they can contribute positively to sustainable building practices when disposed of or replaced.
4. Adding Cross Members Cross tees are inserted into the main runners at specified intervals to create a grid pattern. These support the drywall panels and enhance stability.
Access panels come in various styles and materials to suit different environments and needs
ceiling tile access panel

Popular articles
- 1
The Fascinating World of Ceiling Trap Doors
- 2
In conclusion, watertight access panels play an essential role in modern construction by combining accessibility, safety, and water resistance. Their ability to effectively safeguard against water intrusion makes them an invaluable asset in various applications. As the construction industry continues to evolve, embracing innovative solutions like watertight access panels will be crucial for creating durable, sustainable, and efficient structures that stand the test of time. Whether in residential buildings, commercial spaces, or industrial facilities, investing in quality watertight access panels is a decision that pays dividends in safety, maintenance, and long-term resilience.
- 3
Suspended Ceiling 101: Mineral Fiber Tiles
- 4
- Cost-Effective Compared to traditional drywall ceilings, suspended ceilings with grid systems can be more cost-effective, both in installation and maintenance.
- 5
3. Versatility and Customization T-bar ceiling access panels can be tailored to specific needs. Whether for fire safety, electrical access, or plumbing maintenance, there are different styles available to meet various operational requirements. The panels can also accommodate different ceiling heights and configurations.
- 6
Average Pricing
- 7
Aesthetic Appeal
- 8
2. Ease of Access A tile grid ceiling provides easy access to plumbing, electrical wiring, and HVAC systems. If maintenance is required, tiles can be easily removed and replaced without the need for extensive construction work, saving time and reducing costs.
tile grid ceiling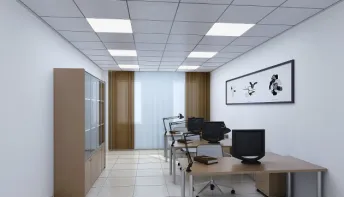
- 9
Maintenance is another area where mineral fiber tiles excel. They can be easily cleaned with a vacuum or damp cloth to remove dust and dirt, ensuring that the space maintains its fresh appearance over time. Furthermore, many products are designed to resist mold and mildew, enhancing indoor air quality—a crucial factor for spaces where people spend significant amounts of time.
- 10
Safety and Building Codes
Links
-
Material
-
Elevate Your Space: Timeless Elegance with Wrought Iron Fencing
-
- Excellent weldability
- In addition to their durability, decorative cast iron or iron elements also offer a wide range of design options. From intricate scrollwork to simple geometric patterns, there are endless possibilities when it comes to choosing the perfect design for your railing or fence. These elements can be custom-made to fit your specific style and preferences, ensuring that your outdoor space reflects your unique taste and personality
decorative cast iron or iron elements are ideal for ending or completing the railing or fences. .- The installation of a decorative cast iron post collar can instantly elevate the ambiance of a space. They lend a sense of grandeur to entryways, provide a focal point in gardens, or add a vintage charm to porch pillars. Moreover, their versatility allows them to complement various architectural styles, from heritage buildings to modern homes seeking a vintage touch.
Lastly, consider the supplier's reputation in the market. Testimonials, reviews, and referrals can provide insights into the experiences of other customers. Engaging with online communities or forums dedicated to wrought iron projects can also yield valuable feedback on potential suppliers.
- The material used to manufacture these money boxes varies, with metals such as copper, brass, or steel being the most common choices. Each material offers its own unique characteristics, with copper having a warm, antique-like finish while steel provides durability and robustness Each material offers its own unique characteristics, with copper having a warm, antique-like finish while steel provides durability and robustness
 Each material offers its own unique characteristics, with copper having a warm, antique-like finish while steel provides durability and robustness Each material offers its own unique characteristics, with copper having a warm, antique-like finish while steel provides durability and robustnessmetal money box with key. Additionally, some boxes may be plated in gold or silver, adding a touch of luxury and sophistication.
 At the end of the day, both fences are fantastic ones. But if you are planning to install your own fence to save time and money, I say go with aluminum as it’s a great product and one of the easiest to build if you’ve never installed a fence before!
- After the door is back in place, test the operation of the door to ensure that the new rollers are working properly. If the door still does not slide smoothly, you may need to adjust the height of the rollers by turning the adjustment screws on the housing.
- Wrought iron baskets have been a staple in home decor for centuries, known for their durability and timeless beauty. The intricate designs and sturdy construction of these baskets make them a popular choice for both indoor and outdoor use.
It will come as no surprise to learn that modern windows are primarily intended to be ‘warm’. This means that they are not supposed to allow warm air to escape from the house. This parameter is described by the heat transfer coefficient Uw, which gives us the answer to the question of how much heat escapes through the window due to the difference in external and internal temperatures.
- Aluminum alloy shutters also have high temperature resistance and UV protection functions. It can prevent indoor wooden furniture from being harmed by ultraviolet rays and effectively insulate outdoor high temperature.
- Excellent surface treatment process to better maintain its shape and color.
- The small metal lock box is more than just an heirloom; it is a repository for the essence of a life lived. It encapsulates the bittersweet nature of existence, holding tightly to the fragments of happiness, loss, and nostalgia that collectively define us. And as I close the lid once more, I am grateful for this small, sturdy vessel that continues to protect the fragile and fleeting moments that make up a lifetime.
Powder coating: 60~120μ; white, black, bronze, gray, green, etc. - Overall, cast iron picket fences are a timeless and elegant choice for any homeowner looking to enhance the beauty and charm of their property. With their durability, classic design, versatility, and low maintenance, it’s no wonder that these fences have stood the test of time and continue to be a popular choice for many homeowners. So if you’re looking to add a touch of sophistication to your home, consider installing a cast iron picket fence – you won’t be disappointed.
- In conclusion, wrought iron gates are a classic and elegant choice for any home or property. When shopping for wrought iron gates for sale near you, be sure to consider the style, size, quality, security, and budget to make an informed decision. With the right wrought iron gate, you can enhance the curb appeal and security of your property for years to come.
- When discussing rod iron fence parts, one cannot overlook the importance of proper footing and posts. These anchor the fence to the ground, ensuring stability. Posts come in various sizes and can be plain or ornamental to match the style of the fence. They must be firmly set in concrete to prevent movement from soil shifts or extreme weather conditions.
- Whilst the slimmest windows are desirable, they don’t always offer the required functionality.
If an aluminium frame is dented or badly scratched, the only solution is to replace it with a new one, which unfortunately involves very high costs. The situation is different with wooden windows, where small scratches can often be repaired, while dents are very rare.
- Insert the new wheels into the housing, ensuring they sit securely and rotate smoothly. Once both wheels are in place, it's time to reattach the door to the track. Carefully align the door with the track and lower it back onto the wheels. Secure it in place by screwing the bottom corners back on. Make sure the door slides easily without any wobbling or catching.
- Strength and durability: aluminum is lightweight yet strong, making it ideal for supporting large glass panes while maintaining structural integrity.
- Designers often explore various styles and forms when crafting steel gate handles. Classic designs often feature sleek, minimalist lines, reflecting a timeless elegance that complements traditional architecture. On the other hand, contemporary designs may incorporate bold, geometric shapes or even incorporate intricate patterns, adding a touch of modern sophistication to the overall look.
- One of the great things about wrought iron railheads is their durability. Unlike other materials, such as wood or plastic, iron is extremely strong and long-lasting. This means that your railheads will not only look great, but they will also stand the test of time.
- Moreover, these gates provide an unparalleled level of security
- Introduction
- In conclusion, while a DIY approach might seem cost-effective, the complexity of sliding door roller replacement often warrants professional intervention. A dedicated 'Sliding Door Roller Replacement Inc' offers expertise, efficiency, and safety, turning a potentially daunting task into a quick and hassle-free home improvement project. Remember, a smoothly gliding sliding door doesn't just enhance convenience; it adds to the overall comfort and appeal of your living space.
- A window profile, in the context of architecture and construction, refers to the specific design or configuration of a window frame. It is the outline or cross-sectional shape that defines the structure and aesthetics of a window, determining its functionality, energy efficiency, and overall visual appeal.
- Material Choose between plastic or metal depending on the door's location and weight. For exterior doors exposed to the elements, metal wheels may provide better longevity.
- In conclusion, the significance of cast iron bases transcends time and function. They are not just materials; they are a testament to human ingenuity and the enduring power of traditional craftsmanship. Despite the advancements in technology, the appeal and utility of cast iron bases remain undiminished, serving as a bridge between our past and present, and a symbol of strength and endurance in our ever-evolving world.
- One of the most notable attributes of cast iron is its durability. Unlike many other metals, iron cast in molds can endure extreme temperatures and heavy loads without warping or breaking. This makes it ideal for creating everything from frying pans that evenly distribute heat to elaborate gates and fences that stand up to the elements year after year.
The global reach of basketball is exemplified by the National Basketball Association (NBA), which has become an iconic league since its inception in the 1940s. The NBA not only showcases the highest level of talent but also serves as a platform for cultural exchange, featuring players from diverse backgrounds and countries. Superstars like Michael Jordan, LeBron James, and Kobe Bryant have elevated the sport to new heights, becoming global ambassadors who inspire young athletes across continents. Their influence extends beyond the court, as they engage in philanthropy, community service, and activism, illustrating the power of sports in shaping society.
Aluminum corner guards do well to protect wood materials, especially in residential spaces. Because aluminum can be customized for many decorative applications, using them as corner guards to adapt to the overall aesthetic of the home, wouldn’t be a problem.
Shipment by sea; by road; by train; multi-transportation.
Cast Iron Railing Panel
- In conclusion, investing in a metal security box for car keys is a proactive step towards safeguarding your vehicle and peace of mind. It's a small yet crucial investment that can potentially save you from the financial and emotional stress of car theft or losing your keys. Remember, prevention is always better than cure, and a metal security box is a preventive measure worth considering in our digital age.
- Excellent weldability
Additionally, wrought iron is more durable than cast iron. Wrought iron acquires more tensile and tensile strength with each heating and working process.
The versions of cast iron fences with a simpler design provide a more straightforward arrangement to be sturdy, somewhat attractive, and less expensive than the variants with an intricate design.
- There are different types of track and wheel systems available for sliding doors, depending on the size and weight of the door, as well as the desired level of functionality. Some doors may have a single track with two wheels, while others may have multiple tracks and wheels for added stability and support. Additionally, there are options for adjustable tracks and wheels that allow for fine-tuning of the door's operation.
What Is The Life Span Of Aluminum Profiles For Windows And Doors?
The origins of head spearing can be traced back to prehistoric times when tribes engaged in territorial disputes and battles for survival. In some indigenous societies, such as the Igorot people of the Philippines or the Dayak tribes of Borneo, headhunting was seen as a rite of passage, a symbol of bravery, and a way to bring honor to one's clan. The act of taking an enemy's head was believed to harness their strength and spirit, empowering the victor and his community.
Wrought iron is known for its durability and potential for reuse or recycling. This makes it a valuable material even at the end of its life. Before disposing of the material, assessing its condition is crucial to determining the most appropriate disposal method:
- Effective Security Solution with Anti-Theft Barbed Wire Mesh for Enhanced Protection
- Manufacturers producing iron wire coil under HS code for global distribution.
- High-Capacity 300 Gallon Stainless Steel Water Storage Solution for Various Needs
- Exploring the Benefits and Applications of Plastic GI Sheets in Modern Construction Projects
- Durable PVC Coated Square Wire Mesh for Various Applications and Enhanced Outdoor Longevity
- High Capacity 1000 Liters Stainless Steel Water Tank for Reliable Storage Solutions
- Durable Hexagonal Wire Netting with PVC Coating for Enhanced Outdoor Protection and Versatility
- Nylon Window Screen Manufacturing Facility for Quality and Durability Solutions in Home Improvement
- Design Considerations for Anchoring Deformed Bars in Construction Applications and Structural Integrity
- Innovative Strategies for Enhancing Efficiency and Performance in Cooling Tower Systems Today
×