mineral fiber ceiling board
Links
-
Take Your Business to the Next Level with a Mobile Auto Detailing Trailer for Sale
-
गाडी धुनको लागि पानी संकुचन गर्ने उपकरणको प्रयोगले केवल दक्षता मात्र बढाउँदैन, यसले गाडी धुनको काममा लाग्ने समय पनि घटाउँछ। पारंपरिक गाडी धुने तरिकामा, प्रयोग गरिने पानीको मात्रा धेरै हुन्छ, जसले गर्दा धुने प्रक्रिया लम्बिन सक्छ। जबकि पानी संकुचन गर्ने उपकरणको प्रयोगले यो समस्या समाधान गर्दछ। यसले कम पानीमा अधिकतम सफाइको सुनिश्चितता गर्छ र कुनै पनि गाडीको गहिराईमा रहेको माटो र गन्दगीलाई प्रभावकारी रुपमा हटाउँछ।
water compressor for car wash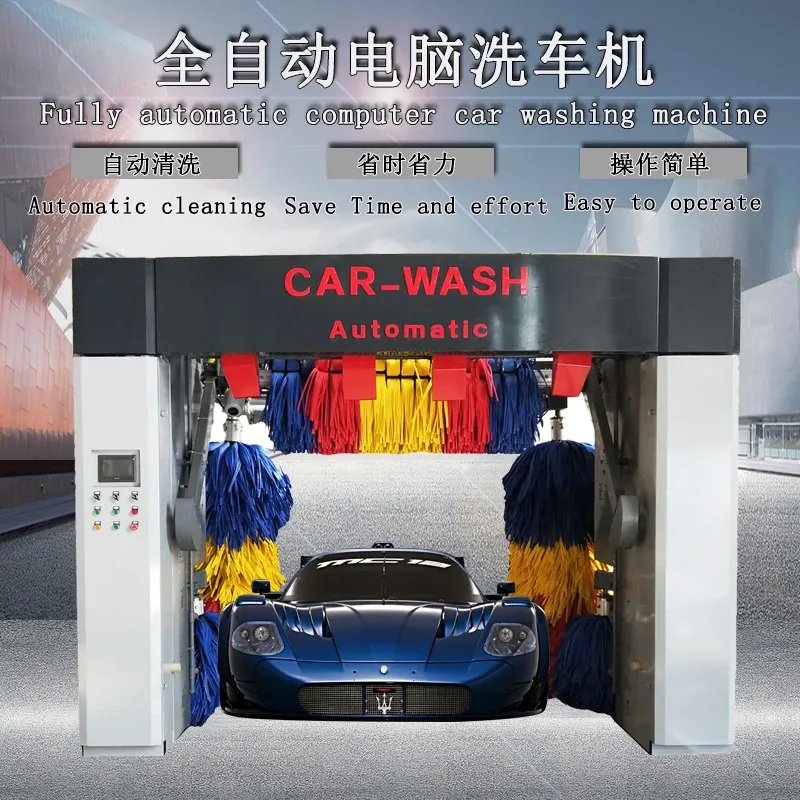
-
There are several types of car wash machines, each with distinct features and benefits
-
In summary, the car wash business relies on a variety of specialized equipment to provide efficient, effective, and high-quality services. From advanced washing technologies to robust drying solutions and environmental management systems, having the right equipment is crucial for success in this competitive industry. As customer expectations evolve, continuous investment in innovative technology will be key to enhancing service quality and operational efficiency in car washes.
-
The Economy of Express Car Wash Tunnel Services Understanding Prices
-
Setting up a car wash involves a significant investment in equipment, planning, and training. By focusing on quality machines and supplies, along with effective processes, you can create a thriving business that meets the needs of car owners in your area. Investing time in understanding the necessary equipment will ultimately lead to satisfied customers and a successful car wash operation.
-
2. Drying Equipment
-
Home car wash machines are designed to be versatile and can handle various cleaning tasks beyond just cars. Many models come with attachments that allow them to clean motorbikes, bicycles, and even outdoor furniture. This multi-functionality makes them a wise investment for anyone looking to maintain cleanliness around their home. Additionally, some machines offer features such as pressure washing capabilities or foam cannons, which enhance their effectiveness for different cleaning jobs.
-
A commercial car washer pump is a vital component that pressurizes water and delivers it through hoses and nozzles to clean vehicles. These pumps are designed to handle high volumes of water and work seamlessly in busy environments where speed and efficiency are crucial. Whether it’s a touchless car wash system or a traditional hand wash setup, the pump's performance directly impacts the quality of the wash and overall customer experience.
-
In today’s fast-paced world, maintaining the cleanliness of our vehicles has become a top priority for many car owners. One area that often gets overlooked is the car mats, which play a crucial role in protecting the car’s interior from dirt, mud, and spills. To keep these mats in pristine condition, more people are turning towards car mat cleaning machines. But how much should you expect to pay for one of these machines? Let’s delve into the factors that influence the price and what you can find in the market.
-
3. Agitate the Surface For tough spots, you may want to use a microfiber wash mitt to gently scrub the surface. Be careful not to use excessive pressure, as this can scratch the paint.
-
Conclusion
-
The Essence of Motor City Car Wash A Shining Example of Automotive Care
-
One of the most critical determinants of price is the motor type and power output. Electric high-pressure washers, which are quite common for residential use, usually range from 1300 to 3000 PSI (pounds per square inch). Higher PSI ratings correlate with more powerful cleaning capabilities, making them ideal for tough jobs like removing grease or mud. Conversely, gasoline-powered models typically offer even higher pressure ratings, appealing to those who work in more demanding environments. These units, however, tend to come at a higher price point, reflecting their superior performance and durability.
high pressure car washer price
-
When using an electric pressure washer for auto detailing, it’s essential to consider the appropriate accessories that can enhance your cleaning experience. Foam cannons, for example, can be attached to the washer to apply a thick layer of soap suds, which loosens dirt and makes rinsing easier. Various nozzles can also be used to modify the water spray pattern depending on the area being cleaned, ensuring you achieve optimal results without risking damage to your car's paintwork.
-
Health and safety considerations have also propelled the popularity of touchless car washes. In the wake of the COVID-19 pandemic, consumers became more aware of hygiene and cleanliness. Touchless car washes minimize contact, ensuring that both staff and customers maintain a safer distance. This aspect has been particularly appealing to those who remain cautious about shared spaces and equipment.
-
First and foremost, a mobile car valet must be equipped with a reliable and efficient vehicle. This will not only serve as the base for operations but also store all necessary equipment. A van or a large SUV is ideal, as it provides ample space for storage while allowing easy access to items during the cleaning process.
-
Moreover, the fluctuating prices of diesel can create an unpredictable financial environment. Businesses may find it challenging to forecast their expenses, leading to difficulties in budgeting and planning for future growth. As such, the need for robust financial strategies has never been more crucial. Companies may invest in fuel hedging or seek out bulk purchasing options to mitigate the impact of price fluctuations.
-
Trong thời đại hiện nay, ngành công nghiệp rửa xe đang phát triển mạnh mẽ, và nhu cầu sử dụng dịch vụ rửa xe tay ngày càng tăng cao. Để đáp ứng nhu cầu này, việc sử dụng thiết bị rửa xe tay thương mại chất lượng cao là điều rất cần thiết cho mọi doanh nghiệp trong lĩnh vực này. Những thiết bị này không chỉ giúp tiết kiệm thời gian mà còn nâng cao hiệu quả công việc, mang lại trải nghiệm tốt nhất cho khách hàng.
-
One of the most notable innovations in auto car wash equipment is the introduction of touchless car washes. Utilizing high-pressure water jets and specialized cleaning agents, these systems meticulously clean vehicles without any physical contact. This reduces the risk of scratches and swirl marks that can occur with traditional brushes. Touchless systems are particularly appealing to vehicle owners who prioritize maintaining their car's exterior in pristine condition.
-
- 1,500 to 2,000 PSI Ideal for regular car washing. This PSI range is effective for removing general dirt and debris without being overly aggressive on the vehicle’s paint. It's suitable for most types of cars and is a safe option for regular maintenance.
pressure washer for cars psi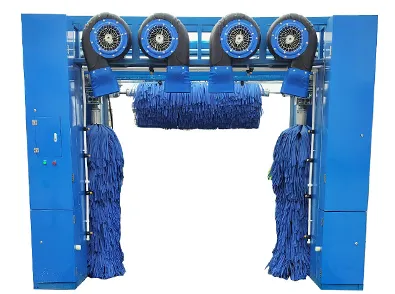
-
The Magic of Bubbles A Dive into the World of Bubbles Wash
-
The Rise of Rolling Car Wash Services A Convenient Solution for Busy Lives
-
The technology behind automated car wash equipment has improved dramatically over the years. Modern car washes employ a combination of laser guidance systems, soft cloth brushes, high-pressure water jets, and eco-friendly cleaning solutions. This advanced approach not only ensures that vehicles receive a thorough clean but also minimizes the risk of scratches and damage, which can often occur with manual washing methods. Furthermore, these systems are designed to conserve water, making them an environmentally friendly choice for vehicle cleaning.
automated car wash equipment
-
Wanneer we denken aan een schone auto, komt vaak het beeld van een glanzend voertuig naar boven dat net uit de wasstraat komt. Een belangrijke factor in dit proces zijn de systemen die water en vacuüm gebruiken. Deze combinaties van technologieën spelen een cruciale rol in de effectieve autowasbeurten die we tegenwoordig kennen.
-
In conclusion, the rise of fully automatic car wash systems represents a significant advancement in automotive care. With their efficiency, effectiveness, environmental considerations, and convenience, these automated systems are redefining how we approach vehicle cleaning. As technology continues to improve, we can expect these car washes to become even more popular, offering vehicle owners a premium cleaning experience tailored to their busy lifestyles. By embracing this technology, car owners can enjoy a sparkling clean vehicle without the hassle traditionally associated with car maintenance.
-
Long-term Savings
-
또한, 터널 카 워시는 환경을 고려한 다양한 기술을 적용하고 있습니다. 물 재활용 시스템을 통해 사용된 물을 재처리하여 반복적으로 사용할 수 있으며, 친환경 세제를 사용하여 환경 오염을 최소화하는 노력을 기울이고 있습니다.
-
As the automotive industry continues to grow, so does the importance of maintaining vehicles in pristine condition. Specialty car wash systems represent a significant advancement in vehicle care, providing effective, customized, and environmentally-friendly solutions. Whether you're a car enthusiast or simply looking to maintain the value of your vehicle, investing in a good specialty car wash system can make a noticeable difference in both the appearance of your vehicle and your overall driving experience.
-
To give the car a finishing touch, various detailing products are available. These include waxes, sealants, and polishes that protect the paint and enhance shine. Additionally, interior cleaning products, such as upholstery cleaners and dashboard wipes, help keep the inside of the vehicle looking fresh and tidy.
-
When using a pressure washer for car washing, safety should be a priority. Always use the appropriate nozzle for your vehicle’s surface to prevent damage. It’s also advisable to wash your car in a shaded area to prevent water spots from forming as the sun dries the vehicle. Ensure to keep a safe distance between the nozzle and the car surface to minimize the risk of paint damage.
-
Conclusion
-
Yksi tärkeimmistä teollisista auton puhdistustarvikkeista on erityiset pesuaineet, jotka on suunniteltu poistamaan likaa, rasvaa ja muita epäpuhtauksia tehokkaasti. Nämä pesuaineet voivat olla joko biologisesti hajoavia tai synteettisiä, riippuen käyttötarkoituksesta ja ympäristönsuojelustandardeista. Esimerkiksi, ekologiset pesuaineet ovat yhä suositumpia, sillä ne tarjoavat tehokkuutta ilman haitallisia kemikaaleja. Tällaiset tuotteet ovat turvallisia sekä ihmisille että ympäristölle, mikä tekee niistä erinomaisen valinnan nykyaikaisille puhdistusratkaisuille.
industrial car cleaning supplies
-
Tunel yuyucu maşınlar, sənaye və logistikada inqilabi bir yenilikdir. Bu maşınlar, məhsul istehsal edən müəssisələrdən, avtomobil yükgötürmə mərkəzlərinə qədər geniş bir spektrdə istifadə olunur. Məqsəd, müştərilərə yüksək keyfiyyətli, səmərəli və tələblərə uyğun təmizləmə həlləri təqdim etməkdir. Tunel yuyucuların effektivliyi, onların dizaynı və konstruksiya xüsusiyyətlərində öz əksini tapır.
-
स्नो फोम कार वॉश मशीन एका अद्वितीय कार स्वच्छतेचा अनुभव
-
Lopuksi, voitaisiin todeta, että autopesukoneet ovat osa modernia autonkulttuuria, joka tarjoaa järkevän ja ympäristöystävällisen vaihtoehdon perinteiselle käsinpesulle. Ne yhdistävät tehokkuuden, mukavuuden ja ympäristötietoisuuden, mikä tekee autojen hoidosta helpompaa meille kaikille. Vieraile lähimmässä autopesulassa ja koe itse, kuinka paljon helpommaksi elämäsi voi tulla!
-
Commercial car wash systems come in various formats, including tunnel washes, self-service stations, and mobile units. Each type of equipment serves a specific purpose and caters to different customer needs. Tunnel washes, for instance, offer a seamless experience where vehicles move through a series of washing stages, including pre-soaking, scrubbing, rinsing, and drying. This type of system is highly efficient, allowing for a high volume of cars to be washed in a short period, making it particularly appealing for busy urban locations.
-
A clean water car wash utilizes advanced technologies and eco-friendly processes to minimize water waste and reduce harmful runoff. Traditional car washes often consume excessive amounts of water, contributing to a depletion of local water resources and generating wastewater laden with detergents and pollutants. In contrast, modern clean water car washes employ closed-loop systems that recycle water, allowing them to use a fraction of the water that traditional methods require. This innovative approach helps conserve precious water, a resource that is becoming increasingly scarce in many regions around the world.
-
-
Van, doğal güzellikleri ve tarihi dokusuyla bilinen bir şehirdir. Ancak, bu güzel şehrin yanı sıra, iş olanakları ve girişimcilik fırsatlarıyla da dikkat çekmektedir. Bu nedenle, Van'da araç yıkama işletmesi sahipleri için büyük bir fırsat doğdu. Eğer siz de kendi işinizi kurmak ya da mevcut bir işletmeyi devralmak istiyorsanız, Van'da satılık bir araç yıkama işletmesi tam size göre!
- .
-
In recent years, pressure car washers have surged in popularity among car enthusiasts and everyday consumers alike. These machines provide an efficient and effective way to clean vehicles, often delivering superior results compared to traditional washing methods. However, a key consideration for potential buyers is the price of these devices. In this article, we will explore the factors that influence the prices of pressure car washers and provide insight into what consumers can expect when shopping for one.
-
In today's fast-paced world, convenience and efficiency have become paramount in every aspect of our lives, and vehicle maintenance is no exception. Enter the fully automatic car washer—a technological advancement that has transformed the way we clean our vehicles. By eliminating the usual manual labor associated with car washing, these innovative systems provide a swift, effective, and user-friendly solution for car owners.
-
Not all pressure washers are created equal, and choosing the right one is crucial for effective auto detailing. For most car cleaning tasks, a pressure washer with a PSI (pounds per square inch) rating between 1200 and 1900 is ideal. This range is powerful enough to remove dirt and grime but gentle enough to avoid damaging the car's paintwork. Higher PSI models may be suitable for other surfaces, such as driveways or decks, but can be too harsh on automotive finishes.
-
3. Self-Service Machines For businesses targeting cost-conscious customers, self-service car wash machines allow customers to wash their vehicles at their own pace. These systems typically feature high-pressure hoses and foam applicators.
car wash machine for business
-
Types of Car Water Service Equipment
-
Otomatik Araç Yıkama Sistemlerinin Maliyeti
-
दुचाकी धुणेच्या उपकरणांचे दुसऱ्या हातातील विक्रय हे बाजारात वाढत्या मागणीचा एक महत्त्वाचा भाग बनत आहे. विविध प्रकारच्या कार वॉश उपकरणांचा वापर कसा करावा, यावर या लेखात चर्चा केली जाईल.
-
У заключэнне, выкарыстанне прасцірадла для нанесення воска — гэта выдатны спосаб надання арганічнасці вашым паверхням, лучнасць, а таксама эфектыўная абарона ад знешніх фактараў. Такім чынам, гэты метад не толькі спрашчае працэс дагляду, але і забяспечвае працяглыя вынікі, якія будуць радаваць вас на працягу доўгага часу. Не шкадуйце часу на догляд за вашым аўтамобілем — гэта важная частка яго доўгіх гадоў службы!
-
Furthermore, the social aspect of truck ownership cannot be overlooked. Many lifted truck owners enjoy engaging with fellow enthusiasts and showcasing their vehicles. Visiting a drive-through car wash can be a community experience, with truck owners gathering to display their customized rides. This camaraderie fosters a sense of belonging among enthusiasts, making drive-through car washes a popular social hub.
- Angular Contact Ball Bearings Product Guide and Specifications Overview
- 28580 bearing
- weizi bearing bearing ball deep groove
- Roulements à contact angulaire - Performance et Précision
- weizi bearing bearing pressing machine
- weizi bearing cylindrical roller bearing supplier
- weizi bearing nj 206 bearing
- weizi bearing 23244 bearing
- Similar title to 4T L44649 Bearing can be Replacement Bearing for 4T L44649, High Quality and Durable
- Design and Applications of Single Thrust Ball Bearings in Machinery Systems