
Before you begin the installation process for any power transmission component, the first goal is making sure everything is clean and free of any material flaws such as nicks, burrs, scratches, dents, et cetera. Most of these components have very tight tolerances, so maintaining this accuracy is important in their performance.This is especially critical for oil seals because of their function.
 oil seal 22 35 7. The region's strong manufacturing base and growing demand for automobiles and industrial machinery are expected to drive market growth in the region.
 Scrape off all the traces of dirt and old gasket from the engine and sump flanges with a paint scraper.
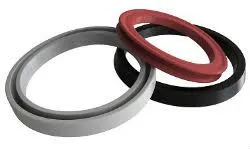
Obtaining adequate adhesion of fluoroelastomer compounds to metal inserts is a major consideration in fabrication of shaft seals. Adhesive systems worked out for bisphenol-cured VDF/HFP/TFE elastomers often do not perform adequately for peroxide-curable fluoroelastomers and more base-resistant polymers that contain little or no VDF. The trend toward use of more resistant fluoroelastomers in shaft seals has necessitated considerable effort on compounding and adhesive system development to get adequate bonding of the new materials. Silane-type primers are often used to coat metal inserts; these contain residual active groups such as amine functions that interact with the fluoroelastomer compound to attain good adhesion, especially for VDF/HFP/TFE elastomers. Other adhesive systems, using epoxy compounds or tie-coats, may be necessary for difficult bonding situations.3
In addition to these standardised types, the following special types are also available:
 Aerospace industry NBR oil seals are used in aircraft engines, landing gear systems, and hydraulic systems Aerospace industry NBR oil seals are used in aircraft engines, landing gear systems, and hydraulic systemsnbr oil seal.
 With minor lip type Used for applications where there are contaminants, such as dust and foreign matter, on the air side face of the oil seal.
The first step in installing oil seals is to clean the surface where they will be placed. Dirt, debris, and other contaminants can cause the oil seal to become damaged or misshapen, leading to leaks. Clean the surface with a solvent or soap and water, and make sure it is completely dry before installing the oil seal.