grid for ceiling
Popular on the whole site
The installation of a suspended ceiling access hatch is a straightforward process but should be performed by professionals to ensure proper fit and function. The first step involves determining the appropriate location for the hatch based on the systems that need to be accessed. Once selected, the area is measured and marked.
1. Aesthetic Appeal The Main T Ceiling Grid allows for sophisticated design choices. With different tile options available, designers can create unique visual patterns, enhancing the overall aesthetics of the space. The ability to customize the tile designs means that spaces can reflect their intended themes or brand identities effectively.
main t ceiling grid

2. Measure and Mark Carefully measure the dimensions of the access panel and mark the area on the ceiling where it will be installed. Use a level to ensure the markings are straight.
Let’s use classrooms as a short case study: It’s necessary for controlling noise within a classroom setting since students only hear 25% of instruction being taught due to poor acoustics.* Noise creates stress, vocal fatigue, and classroom challenges. The key to solving the problem is better acoustics. Reduce the noise while maintaining privacy with acoustical mineral fiber ceiling tiles.
Popular articles
- 1
3. Versatility The 600x600 dimensions make these panels compatible with most standard ceiling grid systems, making them suitable for a wide range of applications, including offices, hospitals, schools, and residential buildings. Their versatility allows architects and builders to incorporate them easily into their designs.
ceiling access panel 600x600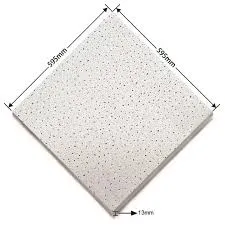
- 2
4. Versatile Applications The 600x600 size is versatile enough to cater to different environments, from office spaces to healthcare facilities and educational institutions. In hospitals, for instance, access panels can facilitate maintenance of critical infrastructure without disturbing operations, thus promoting a safer and more efficient environment for both staff and patients.
- 3
In the realm of modern interior design and construction, the choice of ceiling materials plays a crucial role in determining the aesthetics, functionality, and overall appeal of a space. Among the various options available, PVC coated gypsum ceiling tiles have emerged as a popular choice for both residential and commercial buildings. Combining the classic appeal of gypsum with the durable, moisture-resistant qualities of PVC (polyvinyl chloride), these tiles offer a myriad of advantages.
- 4
Conclusion
- 5
- Food and Beverage Industry The need for cleanliness and hygiene is paramount in food processing plants. Watertight panels ensure that procedures are in place to prevent contamination from water or foreign objects.
- 6
6. Environmental Impact Many modern ceiling tiles are produced using sustainable materials and processes, allowing for eco-friendly construction practices. Additionally, suspended ceilings can help in maintaining better indoor air quality by incorporating features such as air filtration and humidity control.
- 7
Ceiling trap doors are unique and often overlooked features in architecture that serve both practical and aesthetic purposes. Traditionally associated with attics, basements, and hidden spaces in homes or public buildings, these discreet portals hold a myriad of possibilities for homeowners, designers, and builders alike.
- 8
3. Durability and Maintenance
difference between gypsum and pvc ceiling
- 9
3. Hanging the Grid Install the main runners parallel to the longest wall, secure them with suspension wires, and then place the cross tees to form a grid pattern.
- 10
When it comes to modern construction and interior design, suspended ceilings have become increasingly popular. These ceilings provide not only aesthetic benefits but also functional advantages, such as improved acoustics and easy access to plumbing and electrical systems. Key to the successful installation of a suspended ceiling is the use of ceiling grid hanger wire, a crucial component that ensures stability and durability.
Links
-
Begin by loosening the lug nuts on the rear wheels slightly while the car is still on the ground. Then, use the jack to lift the vehicle until it is securely elevated. Place jack stands under the vehicle for added safety before fully removing the tires.
-
Step 4 Raise the Vehicle
- - Une personne pour vous aider (facultatif mais recommandé)
-
Қадами 1 Омодагии автомобил
-
Cuối cùng, việc duy trì và kiểm tra định kỳ hệ thống phanh trống là điều cực kỳ quan trọng. Người lái xe nên chú ý đến các dấu hiệu như tiếng ồn lạ, độ nhạy của bàn đạp phanh hay tình trạng các má phanh để đảm bảo hệ thống phanh luôn hoạt động hiệu quả. Việc này không chỉ giúp tăng cường an toàn khi lái xe mà còn kéo dài tuổi thọ của các linh kiện trong hệ thống phanh.
-
Another significant advantage of the Hydro E-Brake is its versatility. It can be seamlessly integrated into various vehicle types, including performance cars, trucks, and SUVs. This adaptability makes it an attractive option for manufacturers looking to improve their braking systems without compromising on style or function.
-
In conclusion, drum brakes, while often seen as outdated, remain an integral part of many vehicles today. Insights from automotive experts like Scotty Kilmer can assist vehicle owners in understanding the significance of maintenance, the importance of regular inspections, and the value of quality parts. By following these guidelines and staying informed, drivers can ensure that their drum brake systems remain efficient and safe for years to come.
-
Además de su funcionalidad, el tambor de freno 2983C también se encuentra en constante evolución. Los avances tecnológicos han permitido la creación de tambores más ligeros y eficientes, lo que contribuye no solo a la seguridad, sino también a la economía de combustible del vehículo. La implementación de nuevos tratamientos superficiales, como recubrimientos anti-fricción, ha contribuido a mejorar el rendimiento y la durabilidad de estos tambores.
-
De upgrade van trommelremmen naar schijfremmen biedt aanzienlijke voordelen op het gebied van veiligheid en prestaties. Of je nu je dagelijkse voertuig of een raceauto aanpast, de voordelen van schijfremmen zijn duidelijk. Door te investeren in deze conversie, verbetert niet alleen de remkracht, maar ook de algehele rijervaring.
-
Why Adjust Drum Brakes?
-
Zorg ervoor dat alles goed is geïnstalleerd en controleer of er geen losse onderdelen zijn. Plaats vervolgens de trommel terug en zorg ervoor dat deze vrij ronddraait. Dit is belangrijk om te zorgen dat er geen wrijving is en dat de rem goed functioneert.
-
In conclusion, rear drum brakes are a practical choice for the Honda Civic, providing an efficient braking solution for everyday driving. While they may lack some of the performance benefits of disc brakes, their reliability and cost-effectiveness ensure that the Civic remains a popular choice among consumers looking for a dependable compact car.
-
Setzen Sie die neuen Bremsbeläge an den gleichen Ort, wo die alten waren. Stellen Sie sicher, dass Sie alles korrekt montieren, und verwenden Sie die Federmechanismen, um die Bremsbeläge zu fixieren.
-
- Regular Inspections Have your brake system inspected during routine maintenance checks. This can help catch any potential issues early.
-
El freno de mano es un componente crucial en la seguridad de cualquier vehículo. Su función es garantizar que el automóvil permanezca estacionado de manera segura, especialmente en pendientes. Sin embargo, hay situaciones en las que, después de reemplazar los frenos de tambor, el freno de mano puede dejar de funcionar correctamente. A continuación, exploraremos algunas de las posibles razones por las cuales esto puede suceder y qué soluciones se pueden considerar.
-
Another method to identify your braking system is by looking at maintenance records if you have access to them. Vehicles with disc brakes often require less maintenance compared to those with drum brakes since they are less susceptible to moisture and road debris. If the maintenance records indicate that the brake pads are routinely replaced, it's likely you have disc brakes. Conversely, if the records show the replacement of brake shoes and drum resurfacing, your vehicle likely has drum brakes.
-
Otro aspecto importante que se aborda en el gráfico es la compatibilidad de los tambores de freno con diferentes modelos de vehículos. No todos los vehículos requieren los mismos componentes, y el uso de tambores inapropiados puede llevar a un desempeño deficiente o a daños en otros elementos del sistema de frenos. El gráfico de Conmet proporciona una referencia clara para ayudar a los mecánicos a seleccionar el tambor adecuado, minimizando así el margen de error.
- 4. Каскад (пинцет)
-
Regular inspection and measurement of brake drums should be an integral part of vehicle maintenance. It is recommended that drivers consult their vehicle owner’s manual to determine the appropriate intervals for brake inspection. Ignoring worn brake drums can lead to severe consequences, including brake failure, which poses a significant risk to the driver, passengers, and other road users.
-
1. Heat Resistance Regular paint may not withstand the high temperatures generated by brake drums. It's imperative to use high-temperature paint that can resist the heat without peeling or bubbling. Specialty paints designed for automotive applications are recommended.
-
Afslutningsvis er elektriske bremsetromler en uvurderlig komponent i moderne køretøjer. Deres evne til at tilbyde præcision, responsivitet og sikkerhed gør dem til et vigtigt valg for både bilproducenter og forbrugere. I takt med at teknologien fortsætter med at udvikle sig, kan vi forvente, at elektriske bremsetromler vil spille en endnu større rolle i fremtidens køretøjer.
-
2. Better Heat Management Disc brakes dissipate heat more effectively than drum brakes. When brakes are used, they generate heat due to friction, and if this heat builds up, it can lead to brake fade, where the brakes lose effectiveness. Disc brakes are designed to allow for better airflow and cooling, which helps maintain optimal performance.
can we change drum brakes to disc brakes
-
Another key difference lies in maintenance and longevity. Disc brakes typically require less frequent maintenance compared to drum brakes. The exposed design of disc brakes makes it easier to inspect and replace worn components, while drum brakes often require more effort to access and maintain. This can lead to higher long-term costs for vehicles equipped with drum brakes, particularly if the brakes are not regularly serviced.
-
Hur länge håller trumbromsar?
-
What is a Brake Drum?
-
ステアリングのドラムブレーキは、自動車の重要な制動システムの一部であり、効率的なブレーキ機能を提供するために設計されています。特に、2010年のモデルにおけるドラムブレーキの構造と動作について理解することは、自動車メンテナンスや修理において非常に重要です。
-
For Honda Civic owners, understanding the maintenance needs of rear drum brakes is paramount. Regular inspections are vital to ensure the brake shoes are not worn down to the metal, as this can lead to increased stopping distances and safety risks. Unlike disc brakes, which are often easier to inspect and replace, drum brakes can be more complicated to service. Therefore, it's advisable to seek the assistance of a qualified technician for maintenance and repairs.
- - سیلندر ترمز جدید
- 6. Basic hand tools (wrenches, screwdrivers, pliers)
-
결론적으로, 드럼 브레이크 실린더의 누수는 차량 안전에 매우 중요한 문제로, 신속한 진단과 수리가 필요하다. 차량 소유자는 누수 증상이 나타날 경우 즉시 전문가에게 점검을 의뢰해야 하며, 정기적인 유지보소를 통해 이러한 문제를 예방할 수 있다. 안전한 주행을 위해, 드럼 브레이크 시스템의 이상 징후에 귀 기울이는 것이 중요하다.
- - Maßnahmen zur Korrosionsschutzbehandlung (z.B. Rostschutzfarbe)
-
1. Suwmiarki lub szczelinomierza – do dokładnego pomiaru średnicy i grubości bębna.
-
Тэма затрымкі тормазнога барабана стала актуальнай як для прафесійных механікаў, так і для аўтамабілістаў-аматараў. Затрымка барабана можа прывесці да небяспечных сітуацый на дарозе, таму важна разумець прычыну праблемы і спосабы яе ліквідацыі.
-
Můžete přepnout bubnové brzdy na kotoučové brzdy?
-
Fazit
-
では、ブレーキシステムのがんでおり、エアブレーキやアンチロックブレーキシステム(ABS)とのにより、さらにいがされています。ドラムブレーキはのブレーキとしていをるで、しいとのにより、もをけていくことでしょう。
-
Step 6 Bleed the Brakes
-
Fren Diski Değiştirme Rehberi
-
Trin 7 Installer hjulene
-
5. Tools Common tools needed include wrenches, sockets, a jack, jack stands, and possibly a brake line flaring tool if you’re modifying existing lines.
-
Another notable aspect of the drum brake line diagram is the adjustment mechanism. Many drum brakes come equipped with an adjusting screw or an automatic adjuster that maintains the distance between the shoes and the drum. Proper adjustment is crucial for optimal braking performance and extending the lifespan of the brake components. A poorly adjusted system can lead to reduced braking effectiveness or increased wear on the shoes.
-
Tytuł Czy hamulce bębnowe są lepsze od hamulców tarczowych?
-
What are Heavy Duty Brake Drums?
-
لذا، إذا كنت تفكر في استبدال المكابح الأسطوانية في سيارتك، فقد تتراوح التكلفة الإجمالية بين 200 إلى 600 دولار، اعتمادًا على نوع السيارة والعوامل المذكورة. من الأفضل دائمًا الحصول على تقديرات متعددة من ورش تصليح مختلفة لضمان الحصول على أفضل سعر ممكن.
- 4. Avaliação Compare a medição obtida com as especificações do fabricante para determinar se o tambor está dentro dos limites aceitáveis.
-
Begin by loosening the lug nuts on the rear wheels slightly while the car is still on the ground. Then, use the jack to lift the vehicle until it is securely elevated. Place jack stands under the vehicle for added safety before fully removing the tires.
-
Additionally, road salt used for de-icing roads can accelerate the corrosion process. When salt mixes with moisture, it creates a corrosive environment that can damage brake components. If your vehicle is frequently exposed to such conditions and not properly cleaned, the likelihood of frozen rear drum brakes increases.
-
Tout d'abord, garez votre véhicule sur une surface plane et mettez le frein de stationnement. Utilisez des cales de roue pour bloquer les roues restantes et éviter tout mouvement accidentel. Ensuite, déterminez quel goujon doit être remplacé.
-
3. Purge des freins
-
At the core of a drum brake system lies its primary components the brake drum, brake shoes, wheel cylinder, and the hydraulic system. The brake drum is a cylindrical component that rotates with the wheel, while the brake shoes are curved friction materials that press against the inside surface of the drum to create friction when braking.
- Angular Contact Ball Bearings Product Guide and Specifications Overview
- 28580 bearing
- weizi bearing bearing ball deep groove
- Roulements à contact angulaire - Performance et Précision
- weizi bearing bearing pressing machine
- weizi bearing cylindrical roller bearing supplier
- weizi bearing nj 206 bearing
- weizi bearing 23244 bearing
- Similar title to 4T L44649 Bearing can be Replacement Bearing for 4T L44649, High Quality and Durable
- Design and Applications of Single Thrust Ball Bearings in Machinery Systems