how to build a ceiling access panel
Links
-
The primary advantage of anti-slip products is the protection they offer against falls. A slip-resistant environment ensures that both employees and visitors feel safe, significantly reducing the likelihood of accidents. This enhanced safety can lead to lower insurance premiums for businesses, as many insurers reward companies that take proactive measures to mitigate risks.
-
Conclusion
-
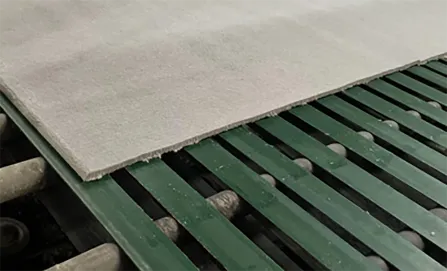
Benefits of Fiberglass Pultruded Grating
-
Safety Considerations
-
In conclusion, FRP grating walkways represent a significant advancement in materials science, bringing a host of benefits that traditional materials struggle to match. Their corrosion resistance, high strength-to-weight ratio, safety features, low maintenance requirements, and environmental sustainability make them an ideal choice for various applications. As industries continue to prioritize longevity, safety, and cost-efficiency, FRP grating walkways are set to play a vital role in the infrastructure of the future.
-
Pentair, a global leader in water treatment and sustainable solutions, has developed its FRP tanks using advanced manufacturing processes that harness the strength and lightweight nature of fiberglass. This composite material is notable for its resistance to corrosion, which is a critical factor in environments that deal with harsh chemicals or saltwater. Unlike traditional steel tanks, which are prone to rust and require regular maintenance, Pentair FRP tanks offer a long service life, significantly reducing the total cost of ownership.
-
4. Supplier and Location Prices can vary significantly between suppliers and geographical regions. Local market conditions, availability, and shipping costs may influence the final price.
-
Secondary treatment focuses on biological processes to degrade organic matter. This is accomplished through aeration tanks, where microorganisms are introduced to consume organic pollutants. The most commonly used methods in secondary treatment include activated sludge systems and biofilm reactors. These processes can significantly reduce the biochemical oxygen demand (BOD) and total suspended solids in the water.
waste water treatment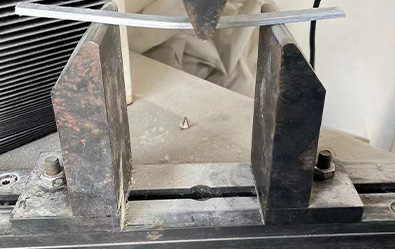
-
1. Improved Appliance Efficiency Softened water reduces scale build-up in appliances and pipes, allowing them to operate more efficiently. This can lead to lower energy bills and prolonged lifespan of appliances like water heaters, dishwashers, and washing machines.
-
2. Lightweight Fiberglass rods are significantly lighter than metal rods or wooden posts. This attribute makes them easier to handle and install, reducing labor costs and time. The lightweight nature of fiberglass also minimizes the need for heavy-duty machinery, allowing for more straightforward installations in various terrains.
-
-
Applications of FRP Water Tanks
- .
-
What Are Galvanized Tanks?
-
In addition to their portability and ease of use, vessel water purifiers are also cost-effective. Compared to bottled water or other types of water purification systems, vessel water purifiers are a more economical option in the long run. By investing in a vessel water purifier, you can save money on buying bottled water and reduce your environmental impact by cutting down on plastic waste.
-
One of the biggest concerns in both commercial and residential construction is the wear and tear of materials over time. Traditional stair treads made from wood, metal, or concrete can be susceptible to corrosion, rust, and decay. In contrast, Fibergrate stair treads are resistant to these issues thanks to their fiberglass composition. They do not rust, corrode, or warp, significantly reducing maintenance costs over time. This durability extends the lifespan of buildings, making these treads a cost-effective investment for long-term safety and functionality.
-
4. Cost-Effective Solution While the initial investment in a whole house water treatment system might be higher than point-of-use options, the long-term savings can be significant. By improving the quality of your water, you prolong the lifespan of your plumbing and appliances, reducing maintenance and replacement costs.
-
Conclusion
-
Stainless steel filter vessels are used across many sectors. In the food and beverage industry, they are employed to remove particles and impurities from liquids before they are packaged for consumption. This filtration process ensures that the final product meets health standards and enhances its shelf life.
-
What Are Galvanized Stock Tanks?
-
In today’s construction and architectural landscape, the use of floor steel grating has gained significant traction due to its unique combination of strength, safety, and versatility. This durable material is prized for both its functional and aesthetic qualities, making it an indispensable component in various applications ranging from industrial settings to commercial spaces and even residential designs.
-
Vision:
-
5. Low Maintenance Requirements Another significant advantage of FRP louvers is their low maintenance requirements. They do not require painting or corrosion protection, unlike traditional metal louvers. This low upkeep need not only saves time but also reduces ongoing maintenance costs.
-
Water is an essential resource for life, and its quality is crucial for human health, environmental sustainability, and economic development. As urbanization and pollution increase, the need for effective water filtration systems, such as water vessel filters, becomes even more pressing. This article explores the significance of water vessel filters, their types, and the technology behind them.
-
In recent years, there has been a growing awareness of the importance of clean and safe drinking water. As individuals become more educated about water quality issues, more homeowners are considering whole house reverse osmosis (RO) systems as a solution. A whole house RO system is designed to purify water at every point of use in a home, providing significant benefits for family health and wellness.
-
In conclusion, molded grating is a versatile and resilient option that meets the needs of modern industries. Characterized by its strength, slip-resistance, customization options, and low maintenance requirements, it has become a favored material choice across sectors. As technology and sustainability drive innovation, molded grating is poised for continued growth and application in diverse fields, shaping the way we approach design and functionality in infrastructure and beyond.
-
Safety is a paramount concern in any work environment, and fiberglass walkway grating excels in this area. The grating often comes with a slip-resistant surface that ensures individuals can walk safely, even in wet and oily conditions. This feature greatly reduces the risk of workplace accidents and injuries, which can be costly and damaging to a company’s reputation. Additionally, fiberglass grating is non-conductive, making it an excellent choice for electrical applications and environments where there is a risk of electric shock.
fiberglass walkway grating
- - Emergency Preparedness Many municipalities and organizations use SMC panel tanks as part of their disaster preparedness plans, ensuring that fresh water is available during emergencies.
-
2. Effective Insulation The insulation incorporated within GRP tanks plays a crucial role in temperature control. This feature is particularly important for applications where water temperature is critical, such as in agricultural settings for livestock or in HVAC systems. By keeping the water at a consistent temperature, GRP insulated tanks can help in energy conservation and efficiency.
-
Fiberglass also boasts excellent insulation properties, making it suitable for both hot and cold water storage. The material’s ability to maintain temperature helps prevent water from freezing during winter months and keeps it cool during hot summers. This feature is critical for agricultural practices where temperature regulation can significantly affect livestock health and crop irrigation efficiency. By using fiberglass containers, farmers and agricultural managers can ensure their water supply remains at optimal temperatures for their specific needs.
fiberglass water container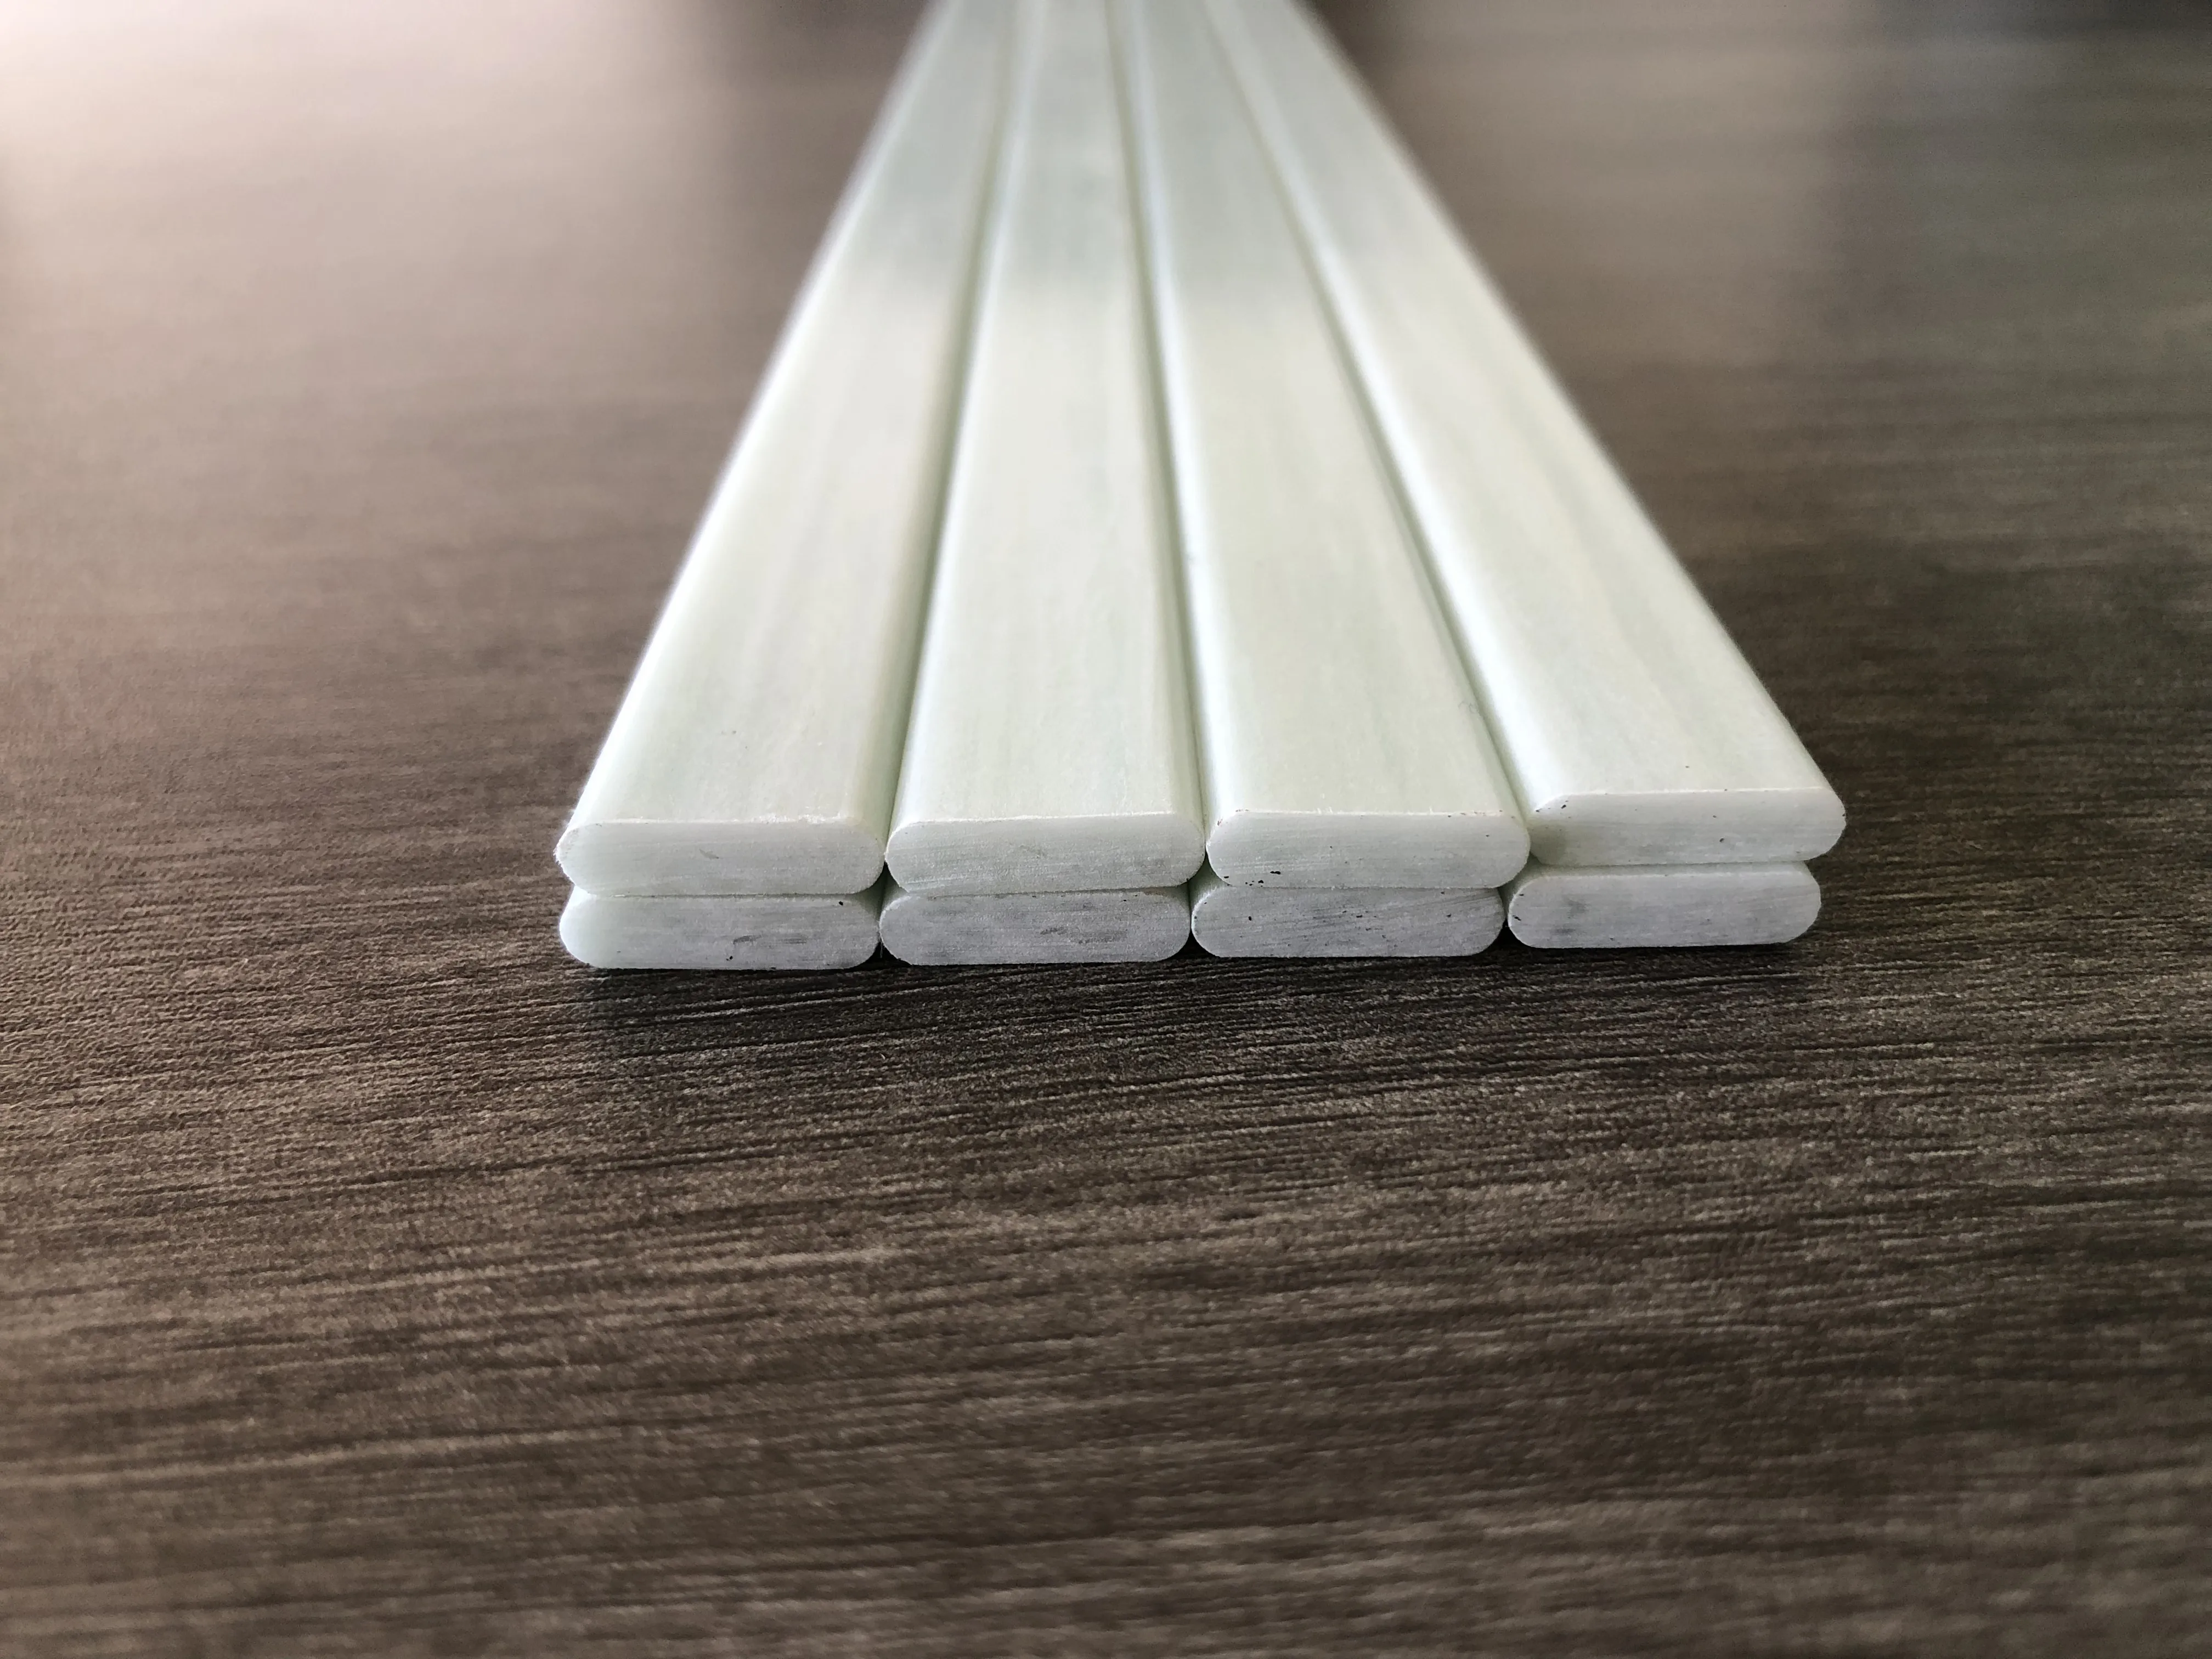
-
Fiberglass stair tread covers are protective strips made from a durable composite material that combines fiberglass and resin. This combination results in a lightweight yet robust product that can withstand heavy foot traffic while resisting environmental factors such as moisture and extreme temperatures. Tread covers are available in various colors, patterns, and finishes, making them a versatile choice for any setting.
-
One of the primary benefits of sectional tanks is their customizability. They can be designed to meet specific site requirements, making them ideal for diverse applications—from water storage in municipalities to agricultural uses for irrigation. Additionally, they can be easily adjusted or expanded as needs change over time.
-
5. Versatility Fiberglass rods can be used in various applications, from agricultural fencing to home security systems. Their adaptability makes them suitable for both temporary and permanent fencing solutions, accommodating different heights and configurations based on specific needs.
-
Understanding UV Water Treatment
-
Eco-Friendly Option
-
Non-Toxic and Safe
-
3. Corrosion Resistance Traditional materials often succumb to corrosion over time, leading to structural damage and increased maintenance costs. GRP panels, with their high resistance to corrosion and chemicals, ensure longevity and reduced upkeep.
-
Reverse osmosis is a water purification process that removes contaminants from water by pushing it through a semi-permeable membrane. This membrane allows only water molecules to pass through while blocking larger molecules, including salts, bacteria, and other impurities. The result is water that is significantly purer than regular tap water.
-
4. Durability and Longevity Many sectional tanks are designed to withstand harsh environmental conditions. Constructed from high-quality materials and treated to resist corrosion, these tanks can endure extreme temperatures and other environmental challenges, making them a reliable solution for long-term water storage.
-
3. Better Cleaning Efficiency Soft water allows soaps and detergents to work more effectively, resulting in cleaner dishes, laundry, and surfaces.
water softener and filter system
-
For instance, several pedestrian and bicycle bridges have been built using FRP decks due to their lightweight properties and ease of installation. Moreover, in areas prone to extreme weather conditions or where salt is used to de-ice roads, the corrosion-resistant nature of FRP is particularly beneficial.
-
Another significant advantage of FRP is its lightweight nature. This characteristic simplifies installation and transportation, especially in remote or challenging locations where heavy machinery may not be readily available. Pentair’s FRP products can be easily maneuvered and installed by fewer personnel, minimizing labor costs and project timelines. This enhances the overall efficiency of water management systems, enabling quicker deployment and more responsive service in urgent situations.
pentair frp
-
Conclusion
-
Furthermore, sectional tanks offer significant cost savings. Since they are often lighter than traditional tanks and can be shipped in sections, the overall transportation costs are reduced. On-site assembly minimizes the labor costs typically associated with constructing larger tanks.
-
The Rise of FRP Walkway Solar Solutions
-
Fire Safety and Decking
-
Key Characteristics of FRP Pultruded Sections
-
Industrial Water Treatment Equipment Ensuring Sustainable Usage and Environmental Protection
-
As environmental concerns continue to rise, many homeowners are looking for sustainable options for their properties. Fiberglass fencing is typically made from recycled materials, making it a more eco-friendly choice compared to traditional fencing materials like vinyl or untreated wood. Additionally, because fiberglass is durable and long-lasting, it can reduce the need for replacement and waste over time, further minimizing its environmental impact.
-
Fiberglass stairs come in various colors, styles, and finishes, offering extensive design flexibility. Whether you prefer a sleek, modern look or a more traditional aesthetic, fiberglass can cater to your design preferences. Manufacturers can mold fiberglass into an array of shapes and patterns, allowing for creative designs that can enhance the overall visual appeal of a space. Moreover, many fiberglass stairs can mimic the look of natural materials like wood or stone, giving you the desired appearance without the drawbacks associated with those materials.
- Angular Contact Ball Bearings Product Guide and Specifications Overview
- 28580 bearing
- weizi bearing bearing ball deep groove
- Roulements à contact angulaire - Performance et Précision
- weizi bearing bearing pressing machine
- weizi bearing cylindrical roller bearing supplier
- weizi bearing nj 206 bearing
- weizi bearing 23244 bearing
- Similar title to 4T L44649 Bearing can be Replacement Bearing for 4T L44649, High Quality and Durable
- Design and Applications of Single Thrust Ball Bearings in Machinery Systems