- Afrikaans
- Albanian
- Amharic
- Arabic
- Armenian
- Azerbaijani
- Basque
- Belarusian
- Bengali
- Bosnian
- Bulgarian
- Catalan
- Cebuano
- Corsican
- Croatian
- Czech
- Danish
- Dutch
- English
- Esperanto
- Estonian
- French
- German
- Greek
- Hindi
- Indonesian
- irish
- Italian
- Japanese
- Korean
- Lao
- Malay
- Myanmar
- Norwegian
- Norwegian
- Polish
- Portuguese
- Romanian
- Russian
- Serbian
- Spanish
- Swedish
- Thai
- Turkish
- Ukrainian
- Uzbek
- Vietnamese
nov . 15, 2024 19:26 Back to list
how to install an access panel in the ceiling
How to Install an Access Panel in the Ceiling
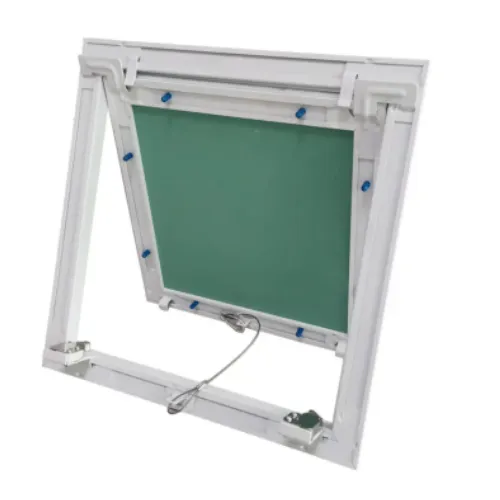
Installing an access panel in the ceiling is a task that can significantly improve the accessibility to your utilities, electrical systems, or plumbing. Whether you’re making repairs or conducting routine maintenance, having a well-placed access panel can save you time and effort. This guide will walk you through the steps to successfully install an access panel in your ceiling.
Tools and Materials Needed
Before you begin, gather all necessary tools and materials. You will need
- Access panel kit (the size and type will depend on your specific needs) - Drill and drill bits - Screwdriver - Measuring tape - Level - Safety goggles - Utility knife - Drywall saw or jab saw - Stud finder - Drop cloth (to catch debris)
Step 1 Identify the Location
The first step is to choose the appropriate location for your access panel. Consider factors such as the proximity to the utilities you need to access, the aesthetics of your ceiling, and any beams or electrical wiring in the way. Use a stud finder to ensure that the location you choose is free of studs, wires, or any obstructions.
Step 2 Measure and Mark
Once you’ve selected a location, use a measuring tape to mark the dimensions of the access panel on the ceiling. Ensure that you mark the outline accurately, as this will guide your cuts. Use a level to ensure your markings are straight and even.
Step 3 Cut the Opening
Now it’s time to cut the opening for the access panel. Using a drywall saw or jab saw, carefully cut along the marked lines. If you encounter resistance, pause to check for any hidden wires or plumbing. Safety goggles are important during this step to protect your eyes from drywall dust and debris.
how to install an access panel in the ceiling

Step 4 Install the Access Panel Frame
Once you have cut the opening, it’s time to install the access panel frame. If you're using a pre-assembled frame, ensure it fits snugly into the opening. Depending on the type of access panel, you might need to secure it with screws or brackets. Refer to the manufacturer’s instructions for specific guidance on installation.
Step 5 Insert the Access Panel
Next, insert the access panel into the frame. It should fit snugly without gaps. Ensure that the panel is level and flush with the ceiling. If the panel has hinges, make sure they are positioned correctly for smooth operation.
Step 6 Secure the Access Panel
Once the access panel is positioned correctly, secure it according to the manufacturer's instructions. This may involve tightening screws or latching the panel in place. Ensure that it is firmly attached to prevent any movement.
Step 7 Finishing Touches
Finally, inspect the installation for any gaps or inconsistencies. You can use joint compound to fill any gaps around the edges if necessary, and once dry, sand it smooth. If your access panel requires painting, you can do so to match the color of your ceiling, helping it blend seamlessly.
Conclusion
Installing an access panel in your ceiling is a straightforward DIY project that can enhance the functionality of your home. With the right tools and careful planning, you can successfully complete this installation. Remember to take your time and prioritize safety throughout the process. Enjoy the convenience of easy access to your utilities!
-
Transform Interiors with PVC Gypsum Ceiling: A Stylish, Durable, and Moisture-Resistant SolutionNewsMay.19,2025
-
The Smart Interior Upgrade: Discover the Durability and Versatility of Gypsum Ceiling Access Panel SolutionsNewsMay.19,2025
-
The Smart Choice for Interior Design: Discover the Value of PVC Gypsum Ceiling SolutionsNewsMay.19,2025
-
Mineral Fiber Ceiling Tiles: The Smart Blend of Performance and AestheticsNewsMay.19,2025
-
Mineral Fiber Ceiling Tiles: The Superior Choice Over Gypsum for Sound and Fire SafetyNewsMay.19,2025
-
Mineral Fiber Ceiling Tiles: Eco-Friendly Strength and Style for Every CeilingNewsMay.19,2025


