


- Afrikaans
- Albanian
- Amharic
- Arabic
- Armenian
- Azerbaijani
- Basque
- Belarusian
- Bengali
- Bosnian
- Bulgarian
- Catalan
- Cebuano
- Corsican
- Croatian
- Czech
- Danish
- Dutch
- English
- Esperanto
- Estonian
- French
- German
- Greek
- Hindi
- Indonesian
- irish
- Italian
- Japanese
- Korean
- Lao
- Malay
- Myanmar
- Norwegian
- Norwegian
- Polish
- Portuguese
- Romanian
- Russian
- Serbian
- Spanish
- Swedish
- Thai
- Turkish
- Ukrainian
- Uzbek
- Vietnamese
get a quote
ก.พ. . 15, 2025 13:08 Back to list
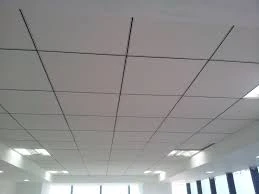
mineral fiber ceiling tiles
Installing a ceiling access panel is a task that requires precision, patience, and a touch of expertise. These panels provide an essential solution for accessing concealed wiring, ductwork, or plumbing in ceilings without compromising the aesthetic appeal of a room. Yet, despite their utility, many homeowners and even some professionals approach their installation with trepidation. Understanding the nuances of this process can transform a daunting project into a satisfying achievement.
When it's time to fit the panel, following the manufacturer's instructions is paramount. However, an insider tip is to always have a friction-fit or screw-fixed installation kit at hand. These kits provide an added layer of security, ensuring the panel remains in place. When attaching the frame of the access panel, make sure it is flush with the ceiling surface. Uneven installation can result in visible lines or gaps, affecting the overall look. To enhance the trustworthiness of your work, consider documenting each step with photographs, especially if you're working as a contractor. Not only does this provide a visual guide for future maintenance, but it also serves as evidence of thorough workmanship if ever questioned. Painting or texturing the panel to blend with the surrounding ceiling often completes the installation. This step is vital for maintaining the aesthetic continuity of the room. Use high-quality paints or textures to match the existing ceiling pattern. If you’re uncertain about achieving a perfect finish, consulting a professional painter can prove invaluable. In summary, the installation of a ceiling access panel is a task that demands attention to detail and an understanding of both the panel’s purpose and the ceiling’s structural integrity. Through careful selection, precise measurement, and diligent installation, these panels provide not just logistical access, but also enhance the usability and safety of a space. Employing best practices and maintaining a focus on quality will ensure the panel serves its purpose efficiently and inconspicuously. For homeowners and professionals alike, mastery of this installation process elevates both skill and property value, reinforcing an authoritative presence in the field of home improvement ventures.

When it's time to fit the panel, following the manufacturer's instructions is paramount. However, an insider tip is to always have a friction-fit or screw-fixed installation kit at hand. These kits provide an added layer of security, ensuring the panel remains in place. When attaching the frame of the access panel, make sure it is flush with the ceiling surface. Uneven installation can result in visible lines or gaps, affecting the overall look. To enhance the trustworthiness of your work, consider documenting each step with photographs, especially if you're working as a contractor. Not only does this provide a visual guide for future maintenance, but it also serves as evidence of thorough workmanship if ever questioned. Painting or texturing the panel to blend with the surrounding ceiling often completes the installation. This step is vital for maintaining the aesthetic continuity of the room. Use high-quality paints or textures to match the existing ceiling pattern. If you’re uncertain about achieving a perfect finish, consulting a professional painter can prove invaluable. In summary, the installation of a ceiling access panel is a task that demands attention to detail and an understanding of both the panel’s purpose and the ceiling’s structural integrity. Through careful selection, precise measurement, and diligent installation, these panels provide not just logistical access, but also enhance the usability and safety of a space. Employing best practices and maintaining a focus on quality will ensure the panel serves its purpose efficiently and inconspicuously. For homeowners and professionals alike, mastery of this installation process elevates both skill and property value, reinforcing an authoritative presence in the field of home improvement ventures.
Latest news
-
Transform Interiors with PVC Gypsum Ceiling: A Stylish, Durable, and Moisture-Resistant SolutionNewsMay.19,2025
-
The Smart Interior Upgrade: Discover the Durability and Versatility of Gypsum Ceiling Access Panel SolutionsNewsMay.19,2025
-
The Smart Choice for Interior Design: Discover the Value of PVC Gypsum Ceiling SolutionsNewsMay.19,2025
-
Mineral Fiber Ceiling Tiles: The Smart Blend of Performance and AestheticsNewsMay.19,2025
-
Mineral Fiber Ceiling Tiles: The Superior Choice Over Gypsum for Sound and Fire SafetyNewsMay.19,2025
-
Mineral Fiber Ceiling Tiles: Eco-Friendly Strength and Style for Every CeilingNewsMay.19,2025


