


- Afrikaans
- Albanian
- Amharic
- Arabic
- Armenian
- Azerbaijani
- Basque
- Belarusian
- Bengali
- Bosnian
- Bulgarian
- Catalan
- Cebuano
- Corsican
- Croatian
- Czech
- Danish
- Dutch
- English
- Esperanto
- Estonian
- French
- German
- Greek
- Hindi
- Indonesian
- irish
- Italian
- Japanese
- Korean
- Lao
- Malay
- Myanmar
- Norwegian
- Norwegian
- Polish
- Portuguese
- Romanian
- Russian
- Serbian
- Spanish
- Swedish
- Thai
- Turkish
- Ukrainian
- Uzbek
- Vietnamese
get a quote
Лют . 15, 2025 19:38 Back to list
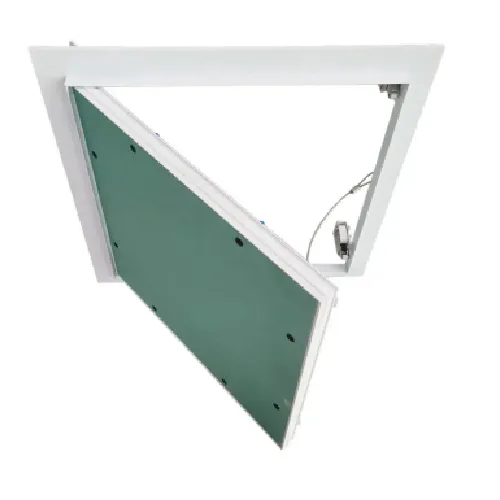
how to install access panel in ceiling
Installing an access panel in a ceiling can seem daunting, but with the right guidance, it’s a straightforward task that ensures easy entry for maintenance and inspection. A well-placed access panel not only enhances functionality but also maintains the aesthetic appeal of a finished ceiling. Below is a comprehensive guide on how to expertly install an access panel, ensuring it meets the highest standards of professionalism and reliability.
After securing the frame, position the door or cover of the access panel. Ensure it operates smoothly, opening and closing without obstruction. If you’ve opted for a hinged panel, check that hinges are robust and allow for a firm, yet accessible opening mechanism. Finish by concealing the panel to blend with the ceiling. This can be done by applying paint or ceiling texture. Paintable panels are a great option if you wish for a seamless look. Allow the paint to dry thoroughly before using the panel. Ensuring the access panel meets safety standards is critical. Check that there are no gaps between the panel and the ceiling, which could undermine the fire rating or insulation of the panel and ceiling. Proper installation not only enhances safety but also adds to the longevity of the panel by preventing warping or sagging over time. Lastly, document your installation process. Take note of the panel type, installation location, and any specific maintenance instructions. This documentation will serve as a useful reference for future maintenance or potential updates to the ceiling’s configuration. In conclusion, installing an access panel in a ceiling is a task that combines precision, safety, and aesthetic sensibility. By following these expert steps, you ensure an installation that is not only efficient and functional but also stands up to professional scrutiny, enhancing your space’s accessibility and maintenance efficiency.
After securing the frame, position the door or cover of the access panel. Ensure it operates smoothly, opening and closing without obstruction. If you’ve opted for a hinged panel, check that hinges are robust and allow for a firm, yet accessible opening mechanism. Finish by concealing the panel to blend with the ceiling. This can be done by applying paint or ceiling texture. Paintable panels are a great option if you wish for a seamless look. Allow the paint to dry thoroughly before using the panel. Ensuring the access panel meets safety standards is critical. Check that there are no gaps between the panel and the ceiling, which could undermine the fire rating or insulation of the panel and ceiling. Proper installation not only enhances safety but also adds to the longevity of the panel by preventing warping or sagging over time. Lastly, document your installation process. Take note of the panel type, installation location, and any specific maintenance instructions. This documentation will serve as a useful reference for future maintenance or potential updates to the ceiling’s configuration. In conclusion, installing an access panel in a ceiling is a task that combines precision, safety, and aesthetic sensibility. By following these expert steps, you ensure an installation that is not only efficient and functional but also stands up to professional scrutiny, enhancing your space’s accessibility and maintenance efficiency.
Latest news
-
Transform Interiors with PVC Gypsum Ceiling: A Stylish, Durable, and Moisture-Resistant SolutionNewsMay.19,2025
-
The Smart Interior Upgrade: Discover the Durability and Versatility of Gypsum Ceiling Access Panel SolutionsNewsMay.19,2025
-
The Smart Choice for Interior Design: Discover the Value of PVC Gypsum Ceiling SolutionsNewsMay.19,2025
-
Mineral Fiber Ceiling Tiles: The Smart Blend of Performance and AestheticsNewsMay.19,2025
-
Mineral Fiber Ceiling Tiles: The Superior Choice Over Gypsum for Sound and Fire SafetyNewsMay.19,2025
-
Mineral Fiber Ceiling Tiles: Eco-Friendly Strength and Style for Every CeilingNewsMay.19,2025


